
Table Legs into Candlesticks
As someone who refurbishes furniture, I tend to have a variety of remnant furniture pieces in my workshop. One of these items includes table legs. Recently, I found a way to repurpose these table legs into candlesticks, and today, I am going to share with you how you can do the same.
You can find table legs in a wide variety of places. I have found them at architectural salvage shops, antique shops, flea markets, yard sales, and Facebook marketplace. If you don’t want to use old table legs, you can buy new wooden legs at most home improvement stores as well as online at places like Amazon and eBay.The goal is to turn these table legs into candlesticks that will hold taper candles.

Supplies
Before we start this project, the first thing we need to do is gather our supplies. Here is a list of the items you will need.
2-4 table legs (Depending upon how many candlesticks you want to make)
A chop saw/miter saw. (You can also use a hand saw to cut the table legs if you don’thave an electric saw)
A drill
A ¾ inch spade bore drill bit
Wood discs approximately 2.5 to 3 inches in diameter
150 and 220 grit sandpaper
A small terry cloth rag
Paintbrush
MMS MilkPaint™ in any color(s) you choose
MilkMix-EZ™
MilkGrip™
Small Wax brush
MilkWax-ECO™ Natural
Most of these supplies can be found at your local hardware store and/or craft store as well as online.
Step 1- Cut the table legs
With your table leg in hand and wooden discs, identify the best areas to make cuts with the saw to create the candlesticks.

I opted to cut mine at the widest part of the curve in the leg. The narrowest point of the table leg will be glued to a wooden disc which will act as a base for the candlestick. Knowing the length of your table leg and visualizing where the wooden disc will be attached will help you to determine the height of your candlesticks as well as where to make your cuts with the saw.
Because we are going to be drilling a ¾ inch hole into the wood, you want the top of the wood to be at least 2 inches in diameter. (See Step 2) So keep that in mind when identifying where you want to make saw cuts on your table leg.
Please note that the wooden disc is not yet attached; I just used it to visualize where I needed to make my cuts.
After you cut your table leg with the saw, it will look like the photo above. The table leg I used created two candlesticks. However, a longer table leg could create three or more candlesticks.
Step 2- Drill out the center of the Candlesticks
Now that you have made the necessary cuts to your table leg, you will need to hollow out the center of the wood to create a place to hold the candle

Using a ¾ inch spade bore drill bit-hollow out the center of the wood to create a place for the taper candle. I drilled down about an inch or so down into the wood to ensure the candle would fit snugly into place. After you have drilled out the center of the wood, your candlesticks should look like the photo above.
Step 3-Attach Wooden Discs and Sand the Candlesticks
Attach Wooden Discs
Hooray! You have made it this far! Nice job! Everything is easier from this point forward. Using some wood glue, attach the wooden disc to the bottom of the candlesticks that need more stability. Please note that I only attached the wooden discs to the candlesticks that were created using wood from the bottom of the table leg. Candlesticks made from the top half of the table legs were already very stable.
When attaching the wooden disc, I let the wood glue dry overnight, but it probably would have been dry enough to proceed with the project after 2 hours.
Sand the Candlesticks
Once the wood glue is dry, then it’s time to sand your candlesticks. Using 150 grit sandpaper, thoroughly sand the wooden candlesticks, paying close attention to all the curves and grooves. Take your time sanding your candlesticks since this is an important step. This is particularly true if the wood for your candlestick was previously painted or covered with a clear coat. You want to create a surface the paint can adhere to and have a smooth finish after your candlestick has been painted. Be sure to sand the perimeter of the candlestick where the saw blade cut through the wood. As a point of reference, I spent about 10-15 minutes sanding each candlestick. After the candlesticks have been thoroughly sanded, use a damp terry cloth rag to wipe them down. The goal is to remove any sawdust or debris that remains on the candlesticks. Once this has been done, you are ready to move on to the next step.
Step 4- Let’s Paint!
This is the fun part! You are ready to paint your candlesticks. Pick out the colors of MMS MilkPaint™ you want to use for your candlesticks. I decided to use the colors from their CoastCollection. Specifically the colors Aqua Sky, Linen, and Sunkissed. Given the time of year and that Mother’s Day is just around the corner, I thought these were the perfect colors to use. Having said that, I also think these candlesticks would be pretty painted in colors from the Farmhouse Collection or the European Collection. Can’t you imagine it? I might need to make more candlesticks ...

The photo above shows the colors in the MMS Milk Paint Coastal Collection just before I mixed them with water.
You can also see that I added a few drops of MilkMix-EZ™ when I mixed up the paint. I also added some MilkGrip™ to each of the paint colors to ensure the paint would adhere to the candlesticks. Make sure you protect your work surface from paint spills and drips. I always seem to make amess when I am painting.

Your candlesticks will probably need 2-3 coats of paint. Table legs that were previously painted or stained a dark color may need additional coats of paint. It takes about 30 minutes for the paint to dry. When your candlesticks are fully painted, you might want to lightly sand them with 220 grit sandpaper to ensure they are smooth. Then, using a small wax brush, apply a coat of MMS MilkWax-ECO™ in Natural. This will seal the paint and protect the wooden candlestick.
Step 5-Enjoy your Candlesticks
This is the best part of the project. Enjoy your candlesticks! With Mother’s Day just around the corner, these are perfect for decorating a table.
Here are some photos of the completed candlesticks.
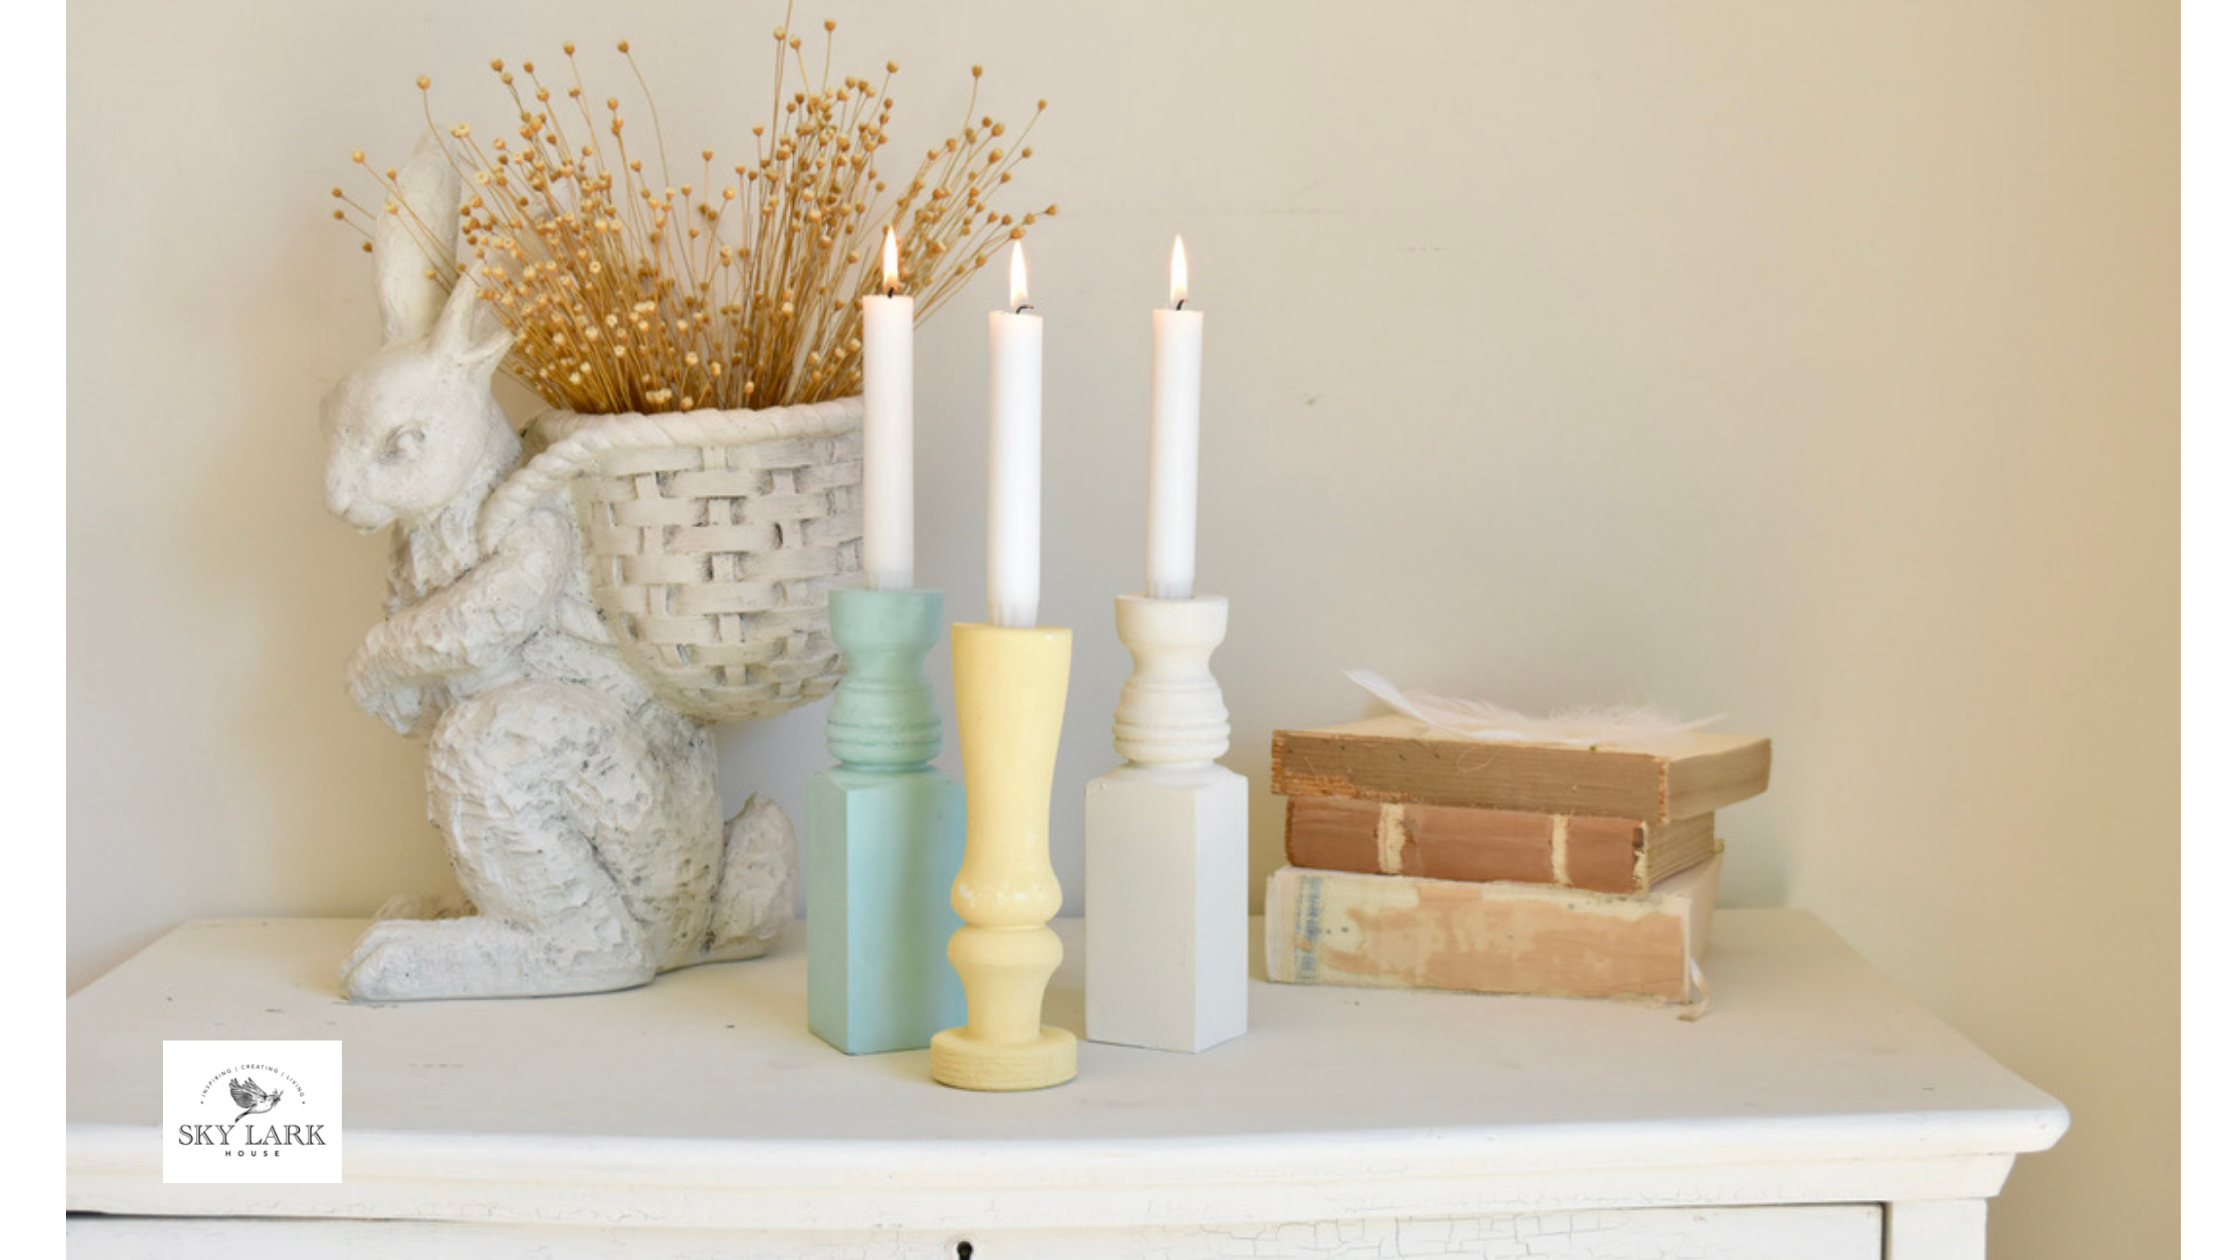
The colors in the MMS Milk Paint Coastal Collection are perfect to compliment late spring and for transitioning into summer.

Summary
Thank you for stopping by the MMS Milk Paint blog today. I hope you are inspired to create these unique candlesticks! After making these candlesticks and painting them in the colors from the MMS Milk Paint Coastal collection, I am now inspired to do the same for their European and Farmhouse collections.