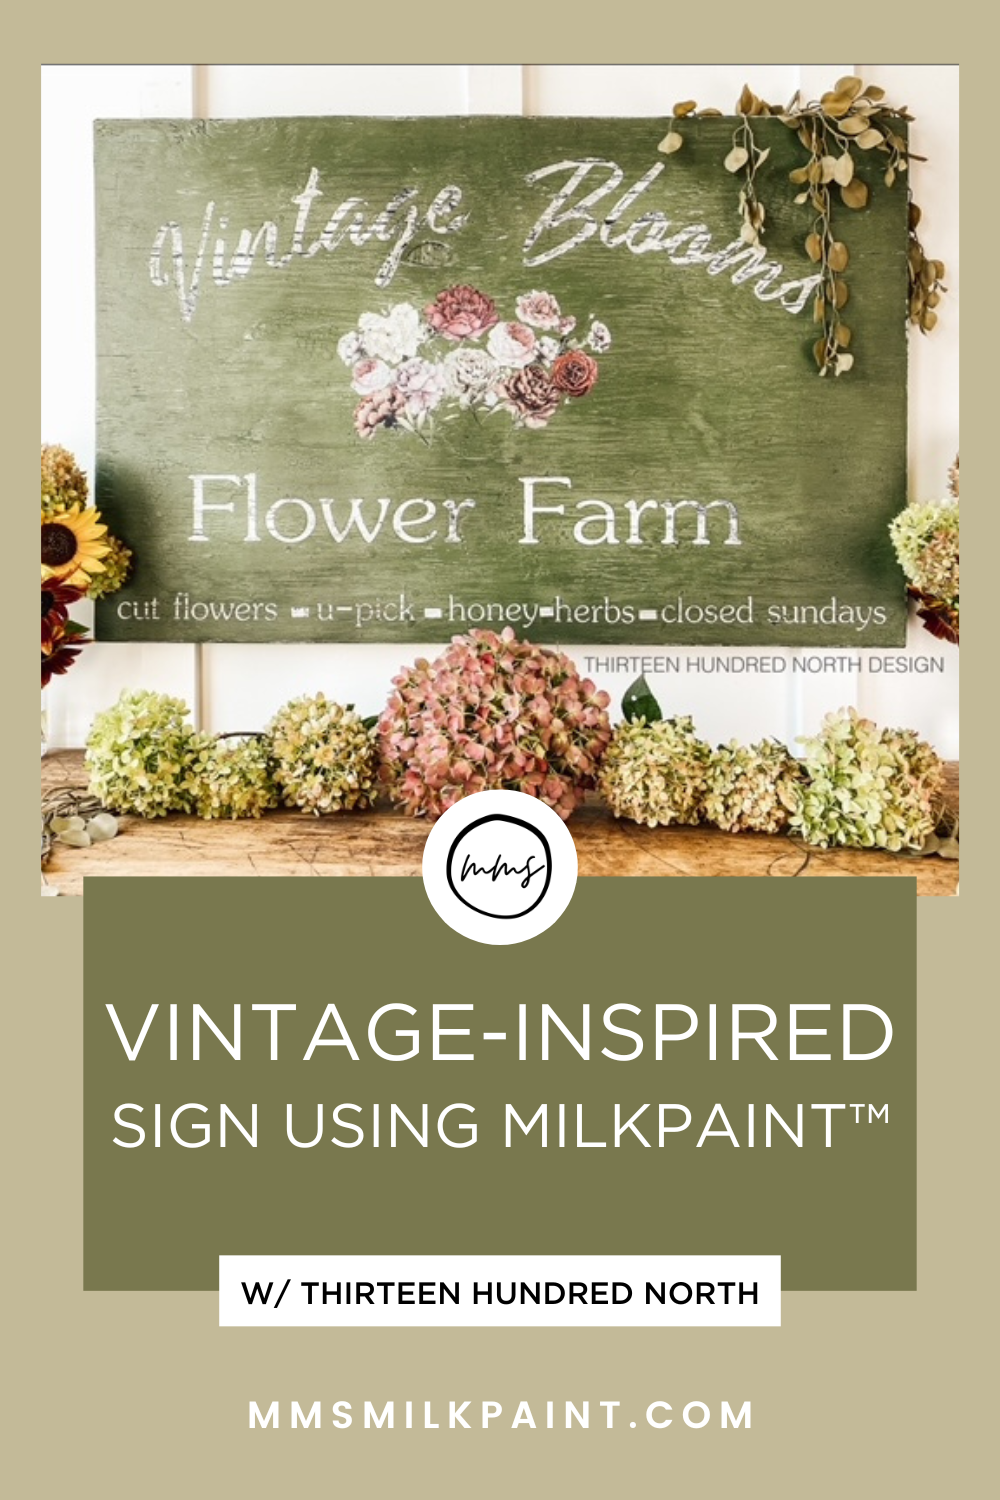
Creating a Vintage Inspired Sign with Milk Paint
If I am being honest, the recent hot weather and the stress of getting my kids back to school had left me feeling a bit uninspired in the painting and creativity department. I think when you are a maker or creator, it is normal to go through ups and downs in your work. When I feel myself getting into that slump, I know I need to go do or see something that inspires me. I think you can draw inspiration from anywhere, but for me, browsing local markets or small businesses to see what other creators are up to usually does the trick! If that is not an option, browsing Pinterest or Instagram can sometimes help to spark new ideas and get the creativity flowing.
I decided I would visit our local market for a bit of inspiration as well as to take the day for myself to recharge. There is a large market near me that is held every third Sunday of the month where vendors come from all over our state to sell their products. There is a little bit of everything and something for everyone! There are coffee trucks, food trucks, bulk candy vendors, antique dealers, small crafts, handmade furniture, primitives, vintage finds, metal art, concrete garden statues, tapestries, jewelry, boutique clothing, wall prints, and anything else your heart desires. I had a great time and felt rejuvenated when I left. Walking around hunting for vintage treasures, daydreaming and brainstorming, is one of my favorite things to do!
Inspiration
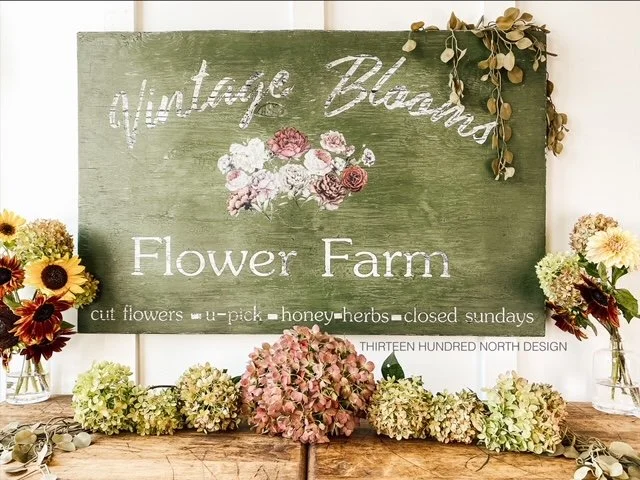
My inspiration for this project came from a vendor at the market that had a display of large antique signs. Many of the signs he had for sale were traffic signs, old business signs, and farm signs, which had the perfect patina but would not fit into my home decor. I thought it would be fun to create a vintage-inspired sign that would look old but would blend nicely into a person’s home. I wanted it to look perfectly vintage and worn. I was looking through design transfers in a local retailer, and I came across the vintage flower set, which inspired me to create this “Vintage Blooms Flower Farm” sign.
Supplies Needed
A large piece of plywood
Semi-gloss black spray paint
Satin clear spray paint
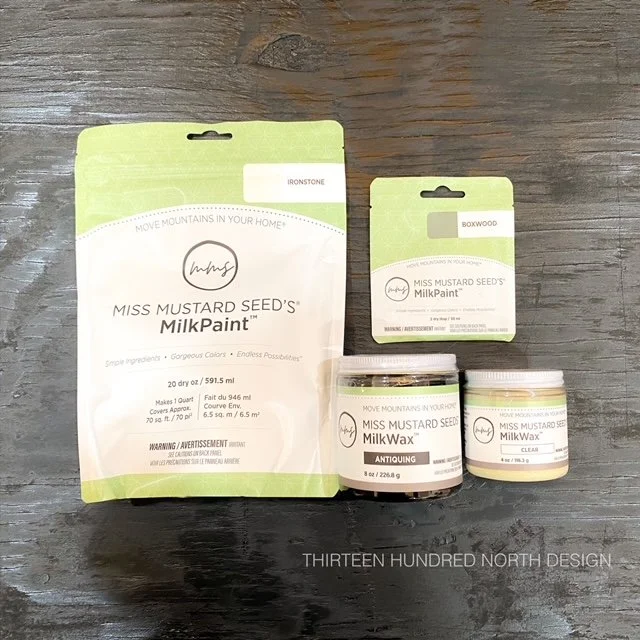
Miss Mustard Seed’s® MilkPaint™ in Ironstone
Miss Mustard Seed’s® MilkPaint™ in Boxwood
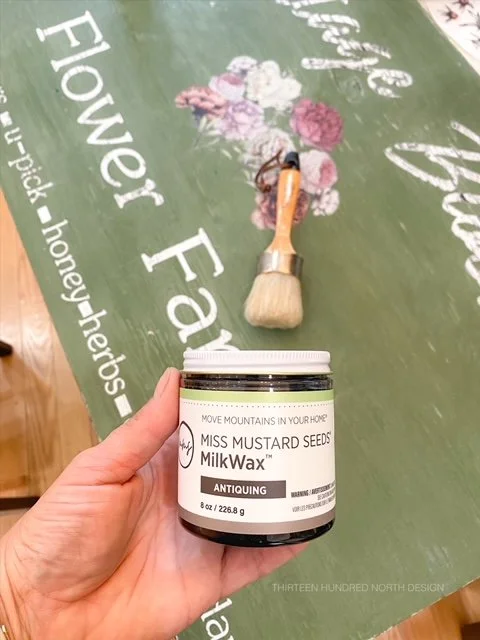
Miss Mustard Seed’s® MilkWax™ in Antiquing
Vinyl stencil
Vinyl weeding tool
Paintbrush
220 grit sanding block
Blue painters tape
Sawtooth hangers
Floral design transfer kit
Table saw
Cricut machine
Step 1: Finding wood for your project
For this project, I opted for a large piece of ½” plywood because I like the texture of plywood when I am distressing a sign with sandpaper. I already had the plywood in my wood pile, which also helped with my choice. I first cut my plywood into a 37” x 24” rectangle using my table saw and then took a sanding block to smooth the edges eliminating any splinters or rough areas.
Many hardware stores will cut down the larger pieces of plywood free of charge for you in the store. I highly recommend having the store cut down the larger panels for you if given that option; not only are they much easier to transport, but it is one less step when you get home. Not having to run a bulky sheet of wood through a table saw by yourself is also safer if you are an accident-prone individual such as myself.
Another option for the wood that could be used for this project would be to purchase a premade sign from the craft store. I was recently browsing Hobby Lobby, and they carry pre-made unfinished signs in the wood craft area as large as 32”. Many hardware stores also carry glued boards in various sizes, and they are very affordable and great for sign-making.
Step 2: Painting the base layer
For the base layer of this project, I started with semi-gloss black spray paint. I did one even coat all over the front and back of the wood before moving on to the milk paint. There are a few reasons I like to use a higher sheen spray paint for the base layer on a chippy finish.
It encourages milk paint to chip by resisting the paint in random places.
Spray paints will give milk paint a crackled texture if you apply milk paint on top of it before the spray paint is completely dry. This is a great way to promote a textured finish.
Spray Paint is typically an oil-based product, and it has great adhesion to wood, so as milk paint that is layered on top of spray paint dries, it will chip, revealing a black base color instead of raw wood. This is especially helpful when you are using new wood and do not want to stain it before you paint.
Step 3: First layer of Miss Mustard Seed’s® MilkPaint™ in Ironstone
With the base layer of spray paint dry but tacky, I applied a layer of Miss Mustard Seed’s® Milk Paint in Ironstone. The paint was mixed as suggested 1:1 paint powder to water. I applied one coat with a paintbrush and let it dry completely.
Step 4: Adding a layer of clear spray paint in a satin sheen
Next, I added a single layer of clear spray paint in a satin finish to seal the first layer of milk paint. I chose to lightly seal this layer, so it did not peel all of the milk paint off when I removed my vinyl stencil letters. This step needs to dry completely before moving on to the vinyl stencil.
Step 5: Using vinyl as a stencil
For the lettering on my sign, I opted to use my Cricut machine, and I cut a stencil using vinyl. I played around with the design and wording until I was happy with it; I then cut the vinyl, weeded the design, and transferred it to my sign with transfer tape. I did draw a small grid before applying the stencil to mark the center of the wood to help with spacing.
I know not everyone uses a vinyl cutting machine, but there are other stencil options on the market. The craft stores carry a ton of stencil letters in various fonts as well as premade sign design options. Etsy is a great place to source vinyl stencils as well. I also found custom order vinyl stencils from sellers on Amazon. Another option would be to print wording from your computer, trace it to the sign with a pencil, then hand paint the letters or image.
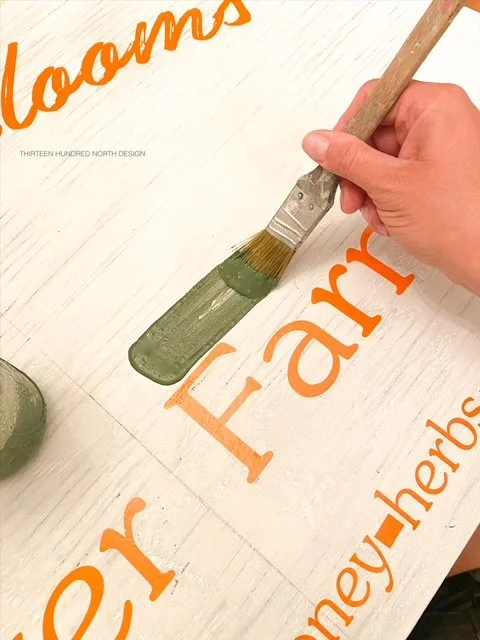
Step 6: Second layer of Miss Mustard Seed’s® MilkPaint™ in Boxwood
After applying my vinyl stencil to the sign, I painted over the entire surface of the sign, including over the top of the vinyl letters, with Miss Mustard Seed’s® MilkPaint™ in Boxwood. After the first coat is dry, add a second coat of Boxwood. Let this second coat dry completely before moving on to the next step.
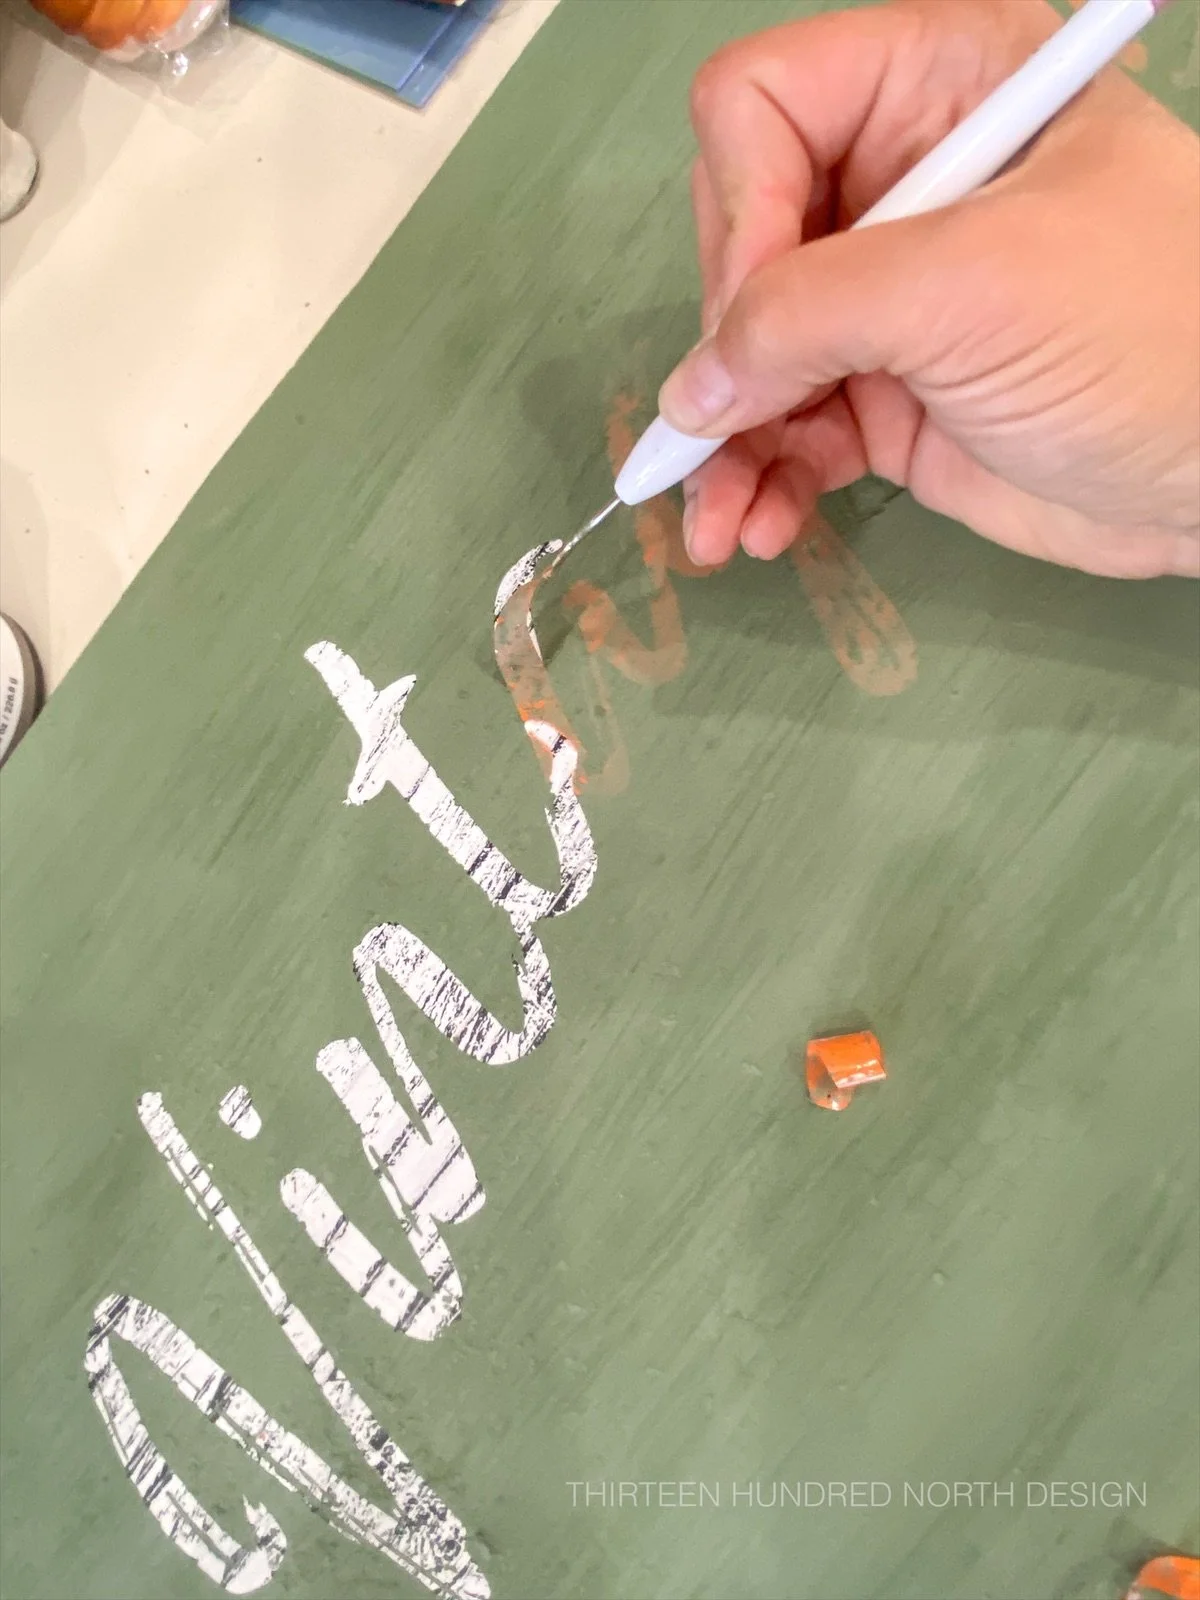
Step 7: Removing your vinyl stencil
This was personally my favorite step; after the milk paint is completely dry, you can start to peel your vinyl letters off of the wood to reveal your wording. I used the Cricut weeding tool for this; however, tweezers or a crafting knife work as well. You can start to see your sign come together in this step. As you peel back your lettering, you start to see the layers of the black, Ironstone, and even a few wood tones start to show through, really giving you a vintage look.
Step 8: Lightly sanding to distress
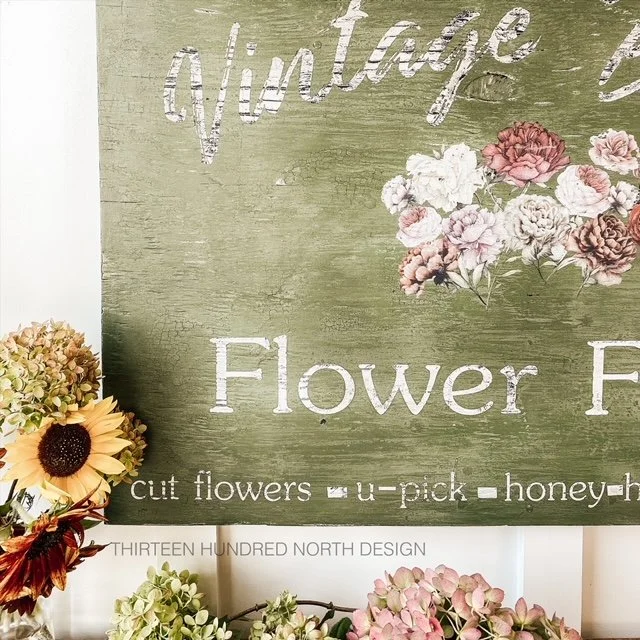
With a 220 grit sanding block, I sanded the sign smoothing out the paint and distressing the edges. As you lightly sand, the layers of color start to show through in the raised areas of the plywood, and it really brings it all together. Remove any dust before moving on to your floral transfer.
Step 9: Applying a floral transfer
Before sealing the piece, I wanted to add a floral transfer to complete the flower farm sign. I found my vintage floral transfer locally; however, there are endless possibilities when it comes to purchasing transfer designs. Amazon has a huge selection of transfer designs, and I am sure you could find one to match the theme of your choosing. Many local furniture paint retailers carry design transfers as well. To apply the transfer, I followed the directions on the package, and everything I needed was in the kit aside from scissors. It is applied simply by rubbing the design on with the provided wood tool.
Step 11: Applying the hangers
I chose to use large sawtooth hangers for this sign as it will likely be hung on a wall, but you could skip this step if you are only intending for your sign to be placed on something and leaned against a wall. The hangers are easily installed with a small hammer and a measuring tape for spacing.
Wrapping Up
I love how this sign came together and how this paint finish turned out. The paints layered together perfectly while peeling and chipping in all of the right places. This was my first time using a design transfer, and it was a very simple process. After looking through the transfer design options online, I have so many ideas for vintage-inspired signs! With fall just around the corner, I think a pumpkin farm sign would be amazing! I hope this tutorial inspired you to try something new!
Happy Creating!