
DIY Barn Quilt
Creating a Barn Quilt: Pattern Included

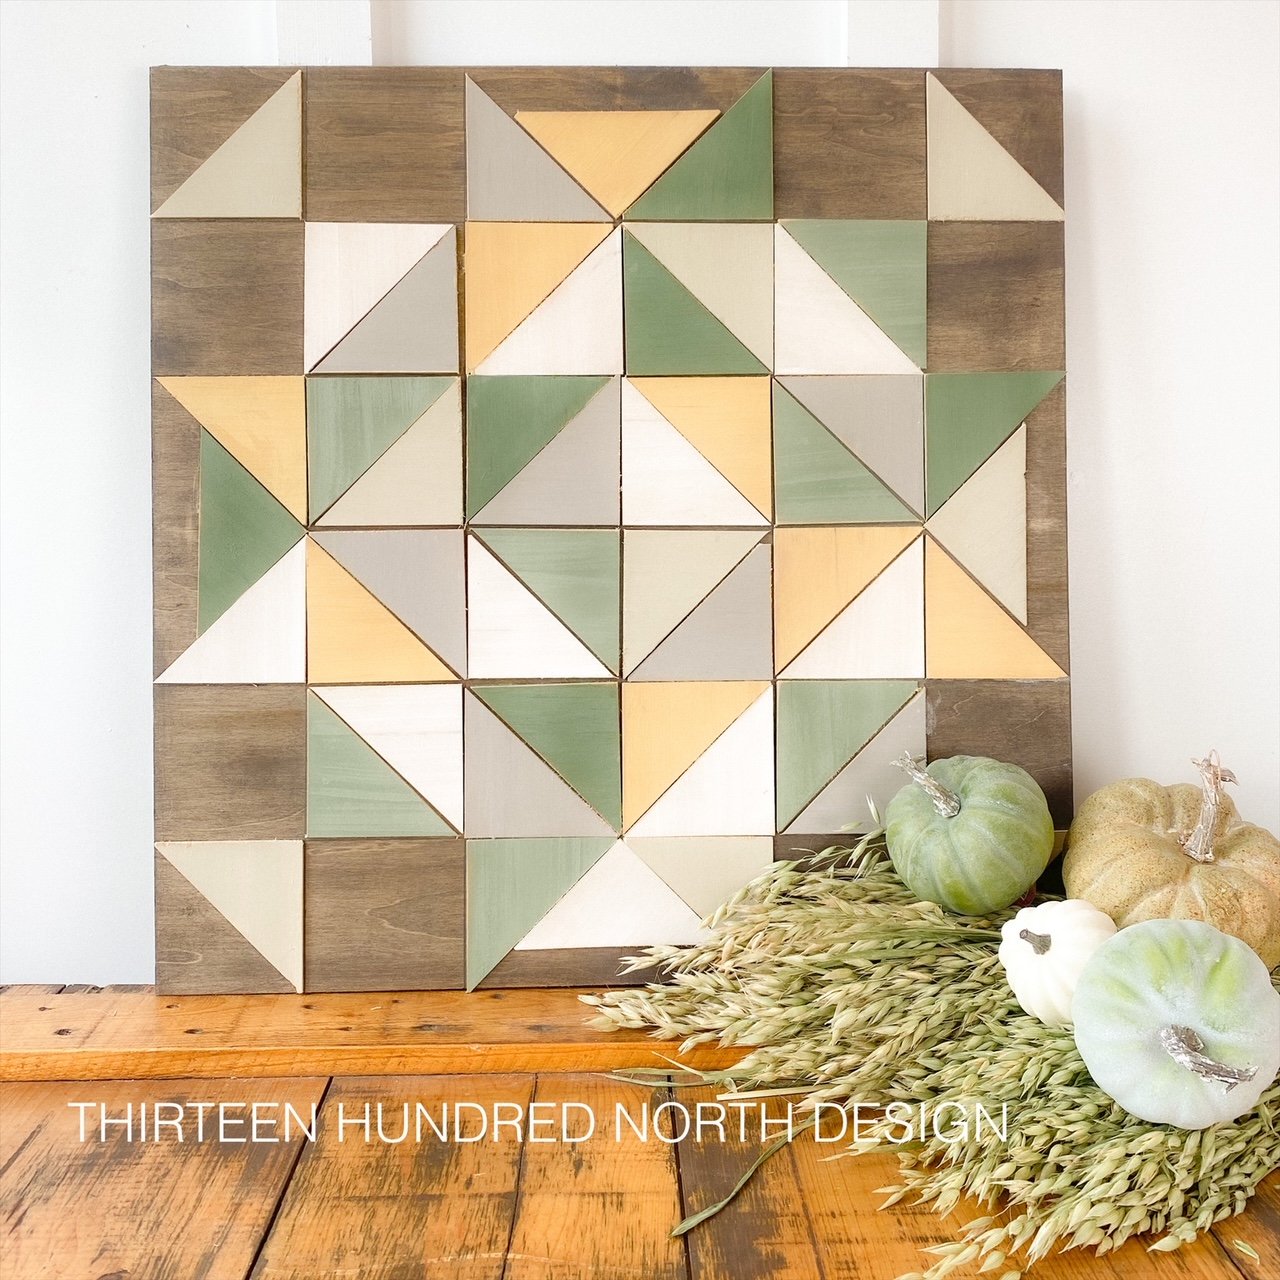
What is a barn quilt? Traditionally, at least in my experience, a barn quilt is a large wooden sign placed on the side of a structure that is patterned after a fabric quilting square. Some are bold and bright, some have shapes, and some have an animal painted in the middle, but each is unique to its creator, much like a quilting square. In the Midwest, where I live, you can drive down most country roads or along any stretch of interstate, and you are sure to see a one-of-a-kind barn quilt on the side of a garage, barn or machine shed. No two quilts are the same, and I absolutely love the charm it adds to any property.
I tried to research the origin of the barn quilt, and it is very unclear where exactly it originated or why, but there is some literature claiming that a version of the barn quilt was created as far back as the 17th century. The tradition has grown and evolved in many countries and is especially popular and celebrated here in the United States. In recent years small towns across the United States have even started to participate in barn quilt tours, so I am adding that to my bucket list!

Inspo
I have wanted to make a barn quilt for my front porch since we purchased our home four years ago. I have always thought the different patterns and colors were so interesting and playful. We live in the country in a farmhouse built in 1873, so when I add landscaping or decor to the outside of my home, I like to honor the heritage of the home and keep the farmhouse charm we originally fell in love with.
I have started and stopped this barn quilt project at least five times over the years because I would start trying to map out a pattern and would start planning what colors needed to be taped off and in what order, and I would get overwhelmed and quit. I struggle with angles and geometry. When it comes to mitered cuts or drawing out angles, my brain shuts off. I was points away from failing my high school geometry class, and honestly…did I really pass, or did the teacher feel sorry for me?? We may never know. My brain needed to find a better way; I needed a version I could wrap my head around that was not so complicated.
I thought if I just used one shape and made them all the same size, it would be much more realistic for me to complete this project. I decided instead of taping, drying, mapping out, and having this grand plan, I would just wing it, and wing it I did. Instead of taping and painting, I cut wood triangles and glued them onto the board more like puzzle pieces, and in my opinion, it was MUCH easier than the traditional painting method.
Tools and Materials Used
24” x 24” precut plywood board found at Menards
4” x 24” precut balsa wood pieces found at Hobby Lobby
Miter Saw
Painters tape
Yard stick or ruler
MilkPaint™ in Boxwood
MilkPaint™ in Schloss
MilkPaint™ in Mustard Seed Yellow
MilkPaint™ in Curio
MilkPaint™ in Carolina Dune
MilkPaint™ in Ironstone
6 Foam paint brush
220 grit sanding block
Wood Glue
Paper towel
Krylon Fusion All-in-one Clear Sealer™ for indoor/outdoor use

Step by Step
Mix Your MilkPaint™
I used six different shades of milk paint for this project, one shade I used as the stain for the main board, and the other five I used to create my “quilt” pieces. I started by mixing Curio in a 1:2 milk paint to water ratio so it was thinner to create the stain. I used 2 TBSP Curio paint powder and 4 TBSP water for a project this size. The other five shades of milk paint I mixed in a 1:1 paint to water ratio. I only needed 1 TBSP of paint powder in each color for a project this size.
Stain Your Base Board
Using the Curio stain I created, I stained the front and the back of the main 24”x24” board. Painting on the stain with a foam brush, and wiping it back with a cloth or paper towel similar to an oil based stain. Allow the paint to dry completely before gluing.
Paint the Balsa Wood
Using the milk paint colors you have chosen, prepaint the balsa wood strips before cutting them. I only needed one coat of paint for this project.

Cutting the Balsa Wood Pieces
I purchased 6 thin pre-cut strips of balsa wood at Hobby Lobby; they came in 24” x 4” sections. I taped all 6 pieces together for easier cutting and then taped every 4” using painters tape, so the wood did not splinter from the saw. I cut all 6 boards at one time. You will end up with (36) 4”x4” squares when you are done.
I then marked each set of squares diagonally on a 45-degree angle with a pencil and ruler, then used my miter saw set at a 45-degree to make each set of my squares into triangles. If you are not one to use a saw, there are pre-cut triangle and square pieces available online that would make this project even easier!

Sand the Edges
Using a 220 grit sanding block, I lightly sanded the edges of the triangles to clean up any wood that had splintered in the cutting process.
Map Out a Grid
On the base piece of the 24”x24” plywood that I previously stained, starting in the middle, I created a grid to follow when gluing the colored triangles. First, make a centered cross that creates 4 boxes, then make lines going either direction every 4”. When you have your grid complete, you should have (36) 4” squares.

Create a pattern
I included the pattern I created; however, my pattern was made at random, and you could certainly create your own pattern in that way. I went through and made sure no two colors were touching and created a star-like pattern. Using the color key for this pattern, you could assign your preferred paint colors a number and achieve the same outcome.

Glue Down Painted Triangles
I applied wood glue to each section and also to the ends of the triangle tips using a painting sponge; I put the wood triangles into place, then applied books and heavy objects to each section to hold them down until the wood glue was dry. I allowed my wood glue to dry overnight.

Distressing
I chose to distress my barn quilt before sealing, but this is completely optional. I used my 220 grit sanding block and lightly scuffed the quilt all over.
Sealing
I chose to seal my piece in an indoor/outdoor clear coat. I used two coats of clear satin Krylon sealant. My quilt is going to be on a covered porch, so that should be adequate protection. If you plan to use this quilt outdoors in the direct elements, multiple coats of a stronger outdoor oil-based sealant would be ideal. If you intend to use this quilt for indoor use, any water-based sealant or wax will work!
Hanging Your Barn Quilt
I opted for sawtooth hangers for my project because I already have a nail on my front porch, but this project could easily be displayed on a shelf indoors. Depending on the location, if you are making this quilt on a larger scale for the side of a barn, you need to screw the quilt directly to the structure.
Final Thoughts
I was so intimidated by this project, but I found a way to simplify it and make it achievable for myself, and I love the end result. Creating more of a puzzle as opposed to a paint-by-number style pattern made the project faster and more simple. I really hope if this is something that interests you, that you try it out for yourself and make the project and the colors your own! No need to have a barn to display a barn quilt, in my opinion! The number of supplies needed was minimal, and the amount of paint could be achieved using the Miss Mustard Seed’s® Milk Paint sample sizes. Happy Painting!
