
Painted Mini Charcuterie Boards
Looking for a quick and simple DIY paint project that is budget-friendly? Then you will love these painted mini charcuterie boards!
Painted Mini Charcuterie Boards
Hey friends, Kelly here from The Tattered Pew, sharing another MMS MilkPaint™ project with you all! The other day I was perusing around our local Target and stopped at the Target Dollar Spot. My eyes immediately were drawn to these mini charcuterie/ cheese boards. They were $5 for a set of two.

Instantly I had a "paint" project brewing in my head!
Boxwood Green
I knew I wanted to paint them in my favorite Boxwood green and add them to a fun Spring tablescape. So I quickly grabbed three sets of two as I envisioned using them at six individual place settings. Then I got to work painting!
Come see how they turned out and how adding Miss Mustard Seed's® MilkPaint™ took them to the next level!

Supplies Needed To Paint Mini Charcuterie Boards
Here is exactly what you will need to paint your own wood charcuterie or cheese boards!
Miss Mustard Seed's® MilkPaint™ ( I used Boxwood)
Miss Mustard Seed's® MilkWax™ Clear
Water
Container to hold paint
Mini mixer, but a whisk will work too
Measuring spoons
Frog Tape
Paintbrush
Mini charcuterie boards (you can find them here if they are gone at Target)
How To Paint Mini Charcuterie Boards
This was a quick and affordable DIY project that took me less than an hour to complete. The first thing you will need to do is gather all of your supplies in one space. (As I mentioned above, if you can't find these exact mini charcuterie boards, Amazon has a wonderful selection! )

I chose to use the color Boxwood because it is my all-time favorite color that is made by Miss Mustard Seed's® MilkPaint™ company, and it goes with everything! You can see it here on my favorite Boxwood painted dresser that lives in our family room, as well as here on a potting bench I painted!
Mix That Paint
Once you have chosen your favorite MMS MilkPaint™ color, mix your paint and set it aside to settle while you prepare your prep area.
Mix equal parts water to equal parts paint. I added the water to my glass jar (2 tbsp) and then added the same amount of paint. When using milk paint, it is important to start with the water first and then add your paint. I used my mini hand mixer to make sure it was completely mixed together.
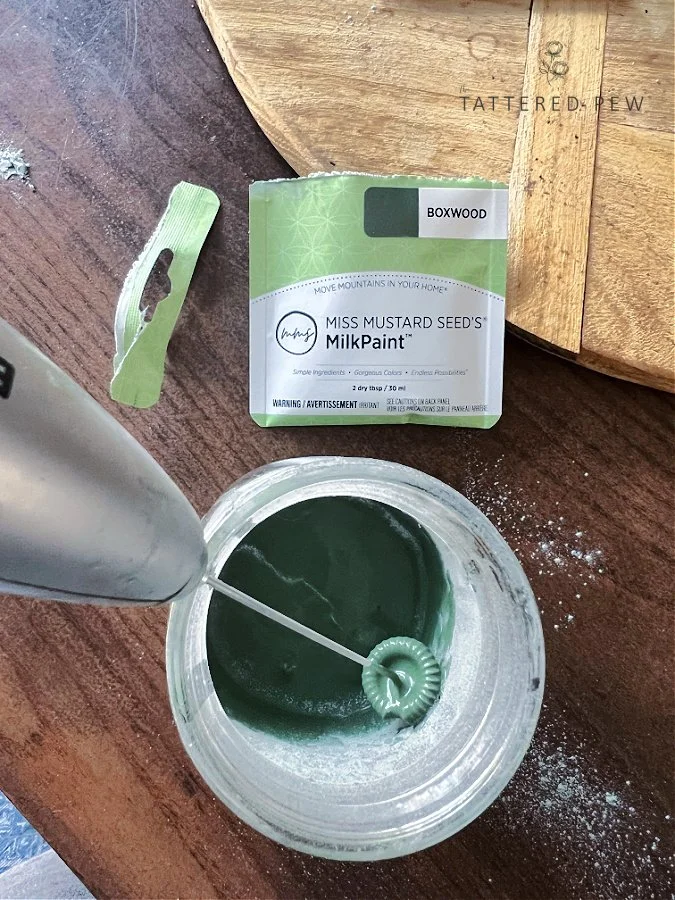
Isn't this Boxwood color just beautiful?!
Next, I let my paint set while I laid down my craft paper on our outdoor table.
Adding The Tape
Once your space and paint are all prepped, you can begin to decide on how to tape your boards. I decided to add strips of Frog tape in different designs on my mini boards so that there would be a mix of wood and paint showing on each board. You might decide you want to paint your entire mini-board, and that would be beautiful as well!
I did three different designs in total.

Tip: This is where you can have fun and get creative!
Once you have decided on your designs and taped them out on your boards, you are ready to paint! Each of my boards required three coats of boxwood to achieve the opaque look I was going for. I love working with milk paint because it is so forgiving, which allows me to enjoy the painting rather than stress over how I might mess it up.

Painting Tip: Continue to stir your paint throughout your project to prevent the settling of pigments in your paint.

Sealing Your Board With Eco Wax
Once your coats of paint are fully dry (this usually takes about 30 minutes), make sure to seal the boards entirely with Miss Mustard Seed's MilkWax- Eco™. This wax is food safe if you decide to use them as individual charcuterie boards! It's also the same wax that I used to seal my butcher block countertops in our laundry room.
It's my favorite wax and smells so good! It literally goes on like butter. Just make sure to apply it with a lint-free rag or brush.
How To Use Your Painted Mini Charcuterie Board
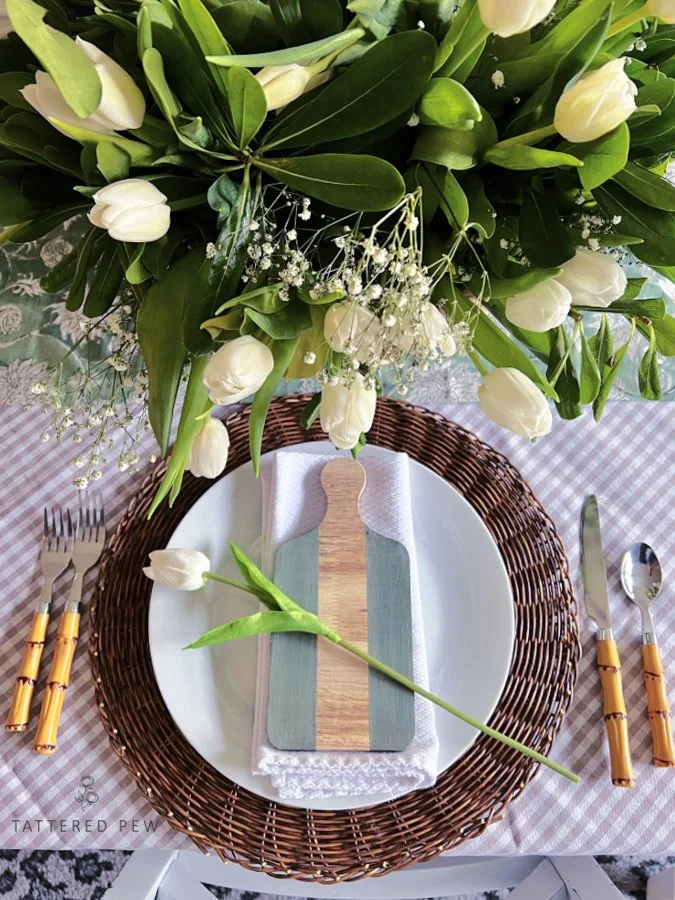
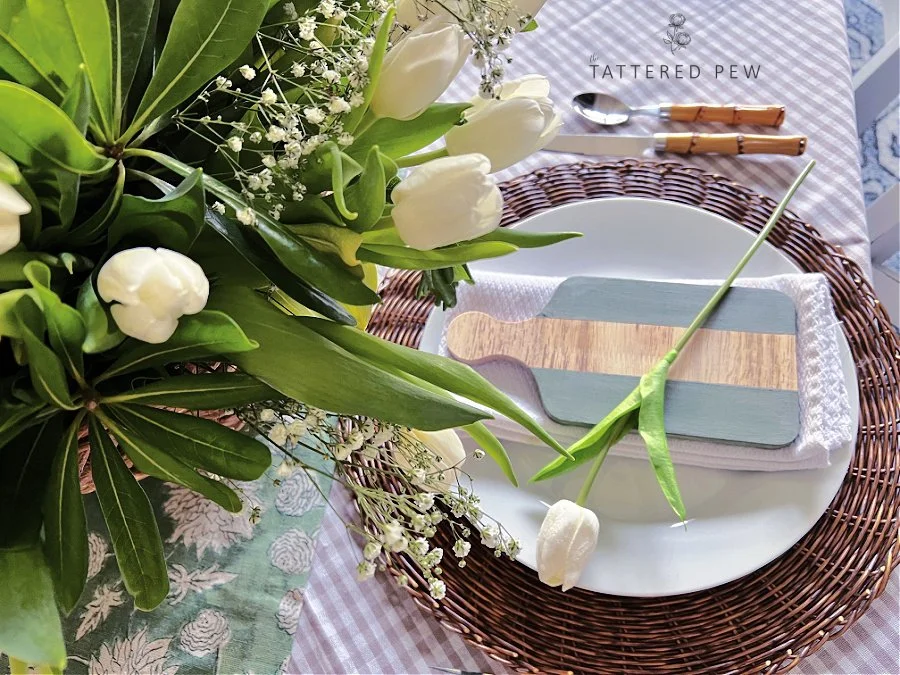
Now your boards are ready to be styled and enjoyed. These mini boards turned out so cute and were done in no time at all! A great project for beginners that look stylish and charming.

I had fun styling them on my Spring dining room table. They fit perfectly on top of my plate and napkin for a lovely layered look. Wouldn't it be so cute to set a place card on top of the board with a guest's name on it?
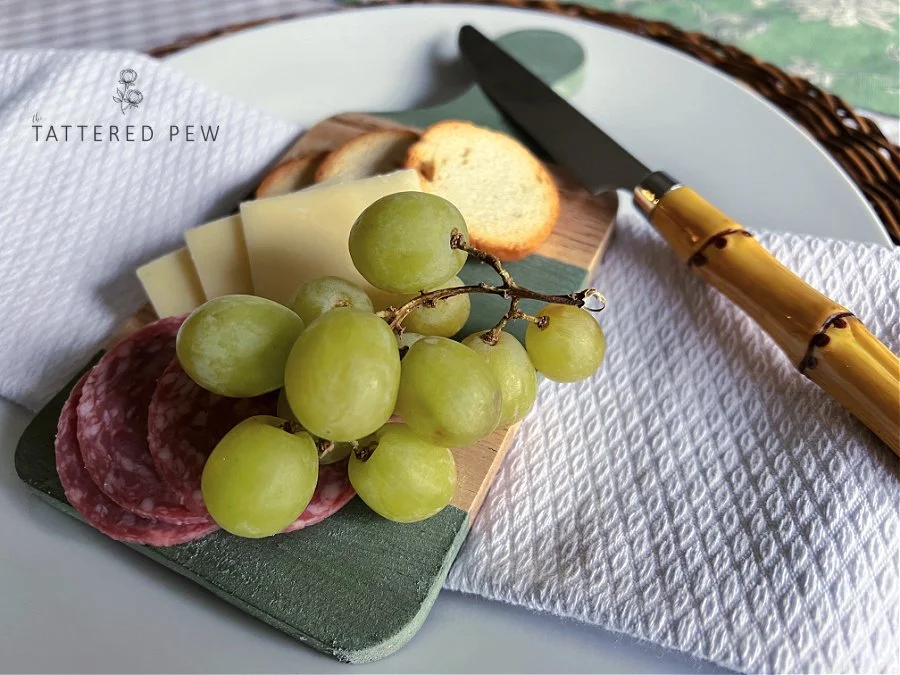
And I had fun turning them into actual individual charcuterie boards too. Wouldn't this be a fun way to enjoy a girls' night with your friends? I'm sure each guest would feel special with their own individual board.
So darling!
Painted Mini Charcuterie Boards
These painted mini Charcuterie boards in the color Boxwood couldn't have turned out any better. If you are looking for a beginner-friendly paint project or a fun and quick DIY, then this project is for you!
How would you use your painted mini charcuterie boards, and what color would you choose? Leave me a comment below, and then make sure to visit my blog, The Tattered Pew, for more fun and easy DIY projects.