Repurposing Vintage School Desks Into Side Tables
Did You Know Desks Make Great Side Tables?
As I started to plan out my upcoming projects, I started to think about early fall and back-to-school time. I started thinking about all of the inventory pieces sitting in my shop, and I remembered that I had purchased a set of vintage school desks at auction a few years ago with the intention of repurposing them. Now seemed like the perfect time to dig them out of my stash and give them a new life.

The History Of The Desks
The sale I purchased the desks from happened to be my husband’s grandmother’s estate sale. I was curious about why she had these little desks with no chairs and the story behind them. I had my husband give his aunt a call and see if she happened to know the history of these school desks, and she could not remember the family using them. His grandmother had eight children, so through many phone calls, we were able to piece together the life of these little desks.
The desks began their lives in a grade school in Southern Illinois and landed in grandma’s house sometime in the 70’s or 80’s, and I am going to guess this was when they received their groovy orange paint job. The desks were used in her front room for the grandchildren to sit and do schoolwork or color in their coloring books. When the grandchildren outgrew the desks, they were moved to the roller rink grandma owned, and the little chairs were sold. Grandma’s roller rink doubled as a senior citizen’s dance hall in the evenings, so the desks then served as speaker tables when the band would set up to play. The roller rink was sold in the early 2000’s, so the desks sat in storage until they went to auction and came home with me! They have certainly lived a long life and were in need of a refresh!

Inspiration
I knew right away when I found these desks, I wanted to repurpose them into side tables or nightstands. I love the height of the desks and the fact that baskets could be added for additional storage in the cubby area.
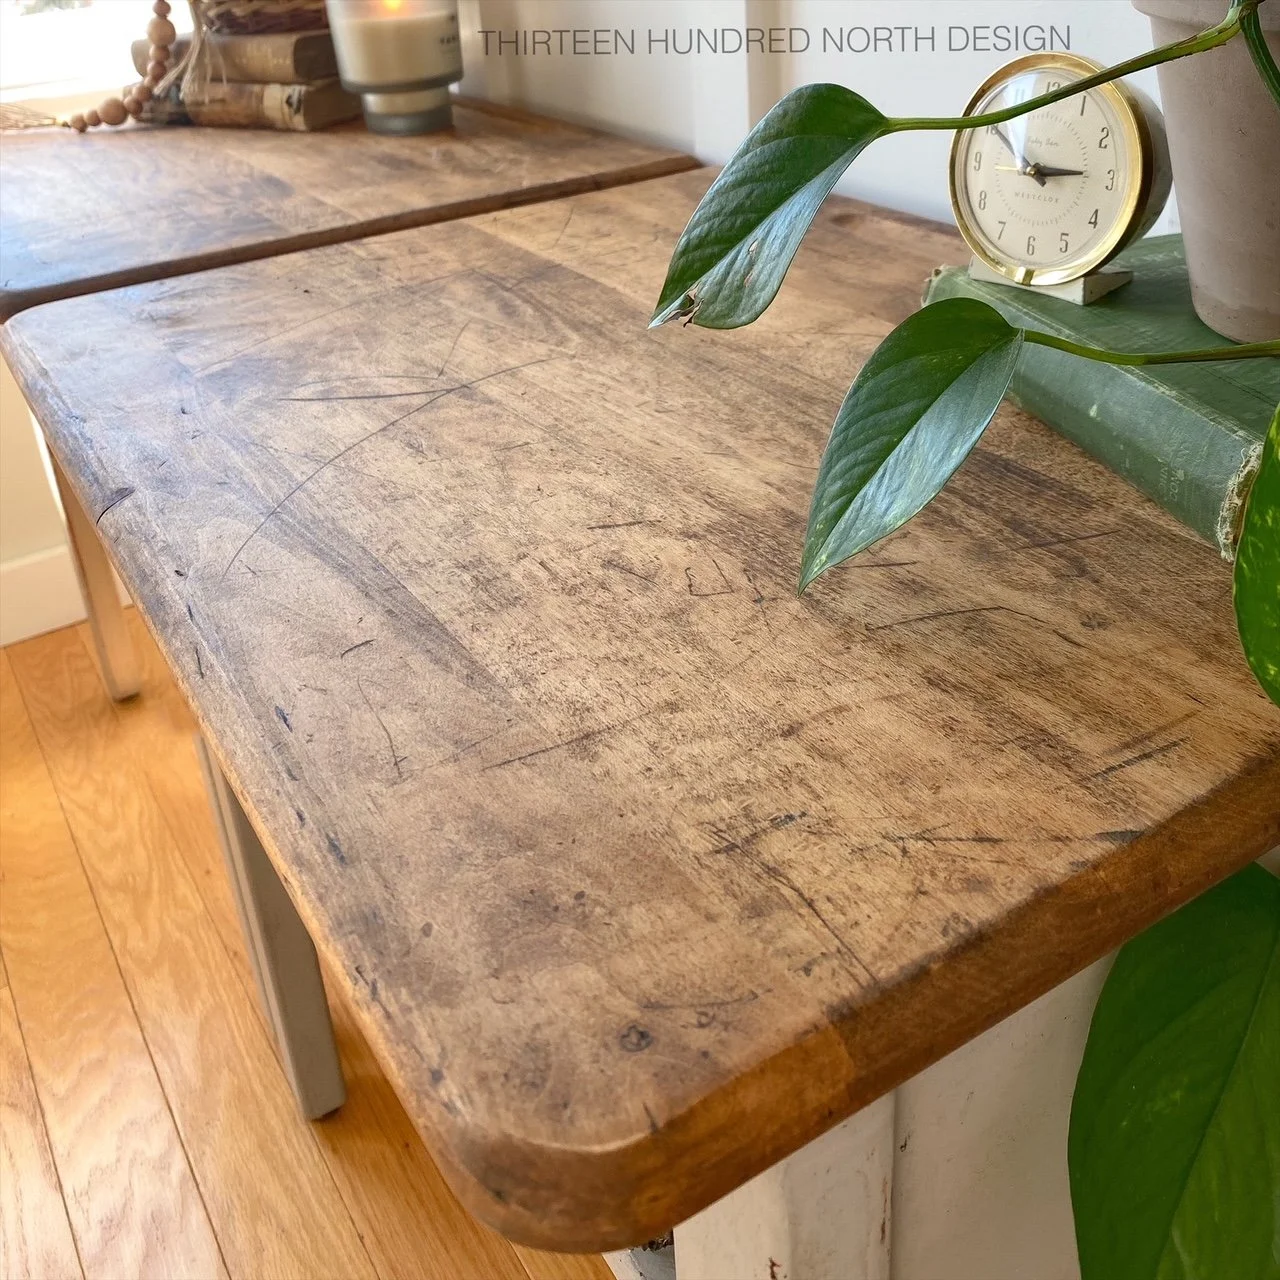
These desks had so much character, and I knew I did not want to lose it! On the top of the desks, students had carved into the wood over the years, and there were plenty of dents and dings all over the base as well. My overall goals for this project were to make the finish look authentically aged and preserve their character while also updating them with a more neutral paint color to make them appealing to a buyer.
Supplies Needed
The products I used to achieve this look are:
Cleaning and Repairs:
Dawn Powerwash
Scrub Daddy Sponge
Vacuum
Microfiber towels
120 grit sandpaper
220 grit sandpaper
Orbital Sander
Painting and Finishing:
Paintbrush
Wax brush
Microfiber cloth
Shop towels
Sponge Brush
Miss Mustard Seed’s® MilkPaint™ in Schloss
Miss Mustard Seed's® MilkCoat™ in Matte
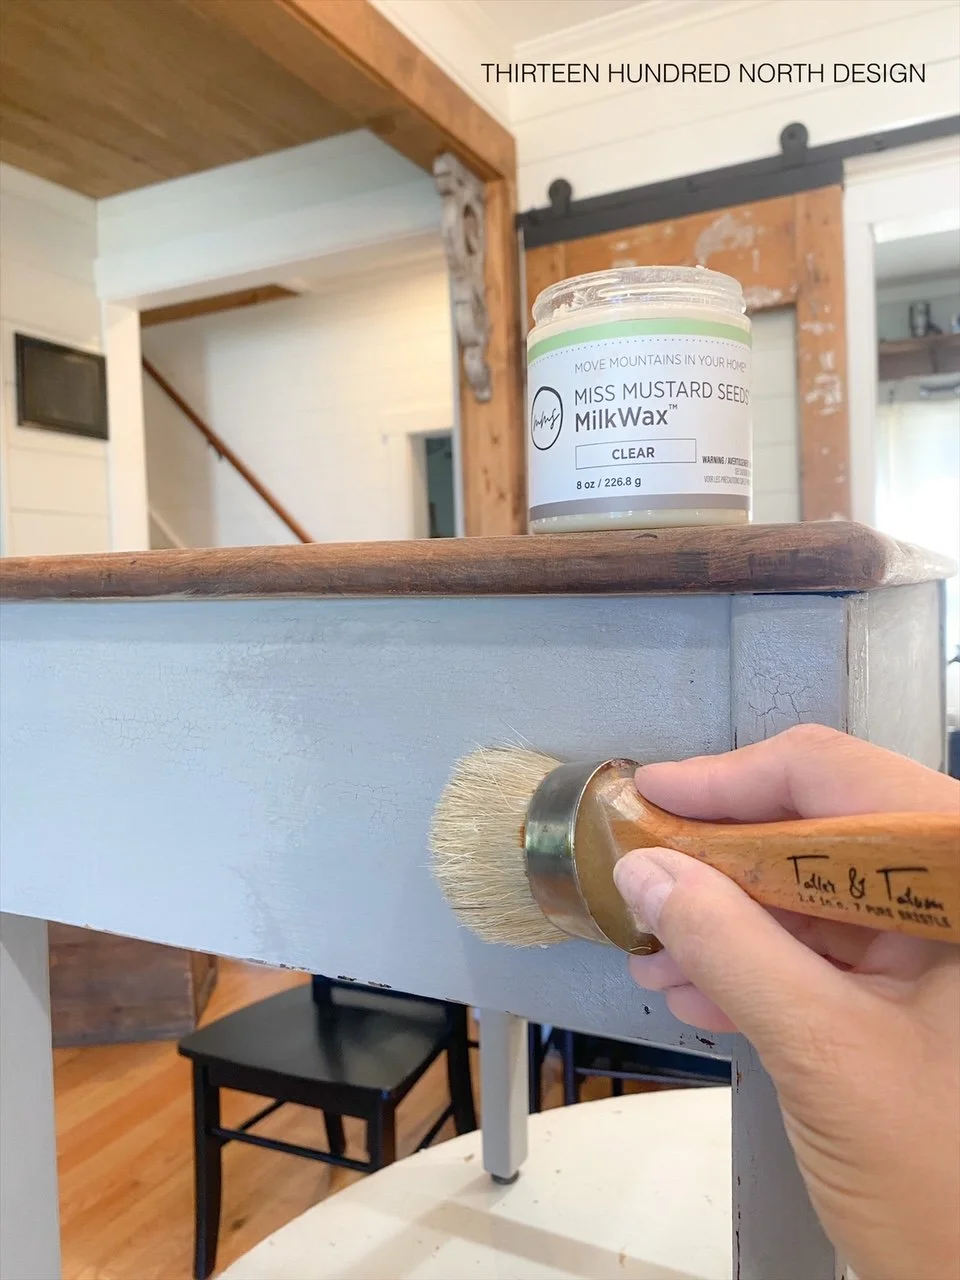
Miss Mustard Seed’s® MilkWax™ in Antiquing
Miss Mustard Seed’s® MilkWax™ in Clear
Minwax wood stain in Early American
Clear satin spray paint
Finishing Touches:
Peel and stick wallpaper for lining the desk interior
Woven storage baskets
Cleaning And Repairs
Considering the age of these desks, they were still incredibly sturdy. I did glue and clamp a few places where the joints had slightly separated, but as far as repairs, that was all I needed to do. I also removed the small pieces of trim in the cubby opening to allow for the addition of storage baskets to slide in and out.
Cleaning was a different story; the desks were dirty from being in storage for the last ten years. I started by vacuuming the desks inside and out, then spraying them down with Dawn Powerwash and scrubbing with an abrasive Scrub Daddy sponge. I ended up scrubbing them down three times before they were really clean. I set them out in the warm sunshine to dry before I got started sanding.
Sanding
I personally try to avoid chemically stripping furniture unless it is absolutely necessary. If a piece I am working on has been previously painted or has a very thick or sticky finish, I will break out the stripping tools; however, if I can take care of it with my sander, I prefer that route. I decided to sand down the top of the desks back to natural wood, being very careful not to lose a lot of the dents, carvings, and scratches. I began with 120 grit sandpaper on my orbital sander to remove most of the old paint on the tops. Then with 220 grit sandpaper, I smoothed out the rest of the superficial scratches. There were a few deeper scratches on the tops I did have to use a bit of a citrus stripper on just to remove any residual paint.
For the body of the desks, I only did a light scuff sand using 220 grit sandpaper to knock off any chipping paint and prepare the surface for painting. I left most of the paint on the base intact because I wanted a layered paint look.
Painting
I started by staining the top of the desks with Minwax Wood Stain in Early American. I applied it to the tops with a sponge brush and wiped off the excess stain with a shop towel. I allowed the stain to dry and then covered and taped off the top in order to spray paint the base.
I used one coat of clear satin spray paint on the desk bases to lock in the previous paint colors to prevent bleed through before painting with the MilkPaint™. This layer of clear spray paint also creates a light resist layer to entice the milk paint to chip and crackle.
I chose Miss Mustard Seed’s® MilkPaint™ in Schloss for the desks; it is a beautiful neutral shade of gray. I really like this color because it does not have a really strong blue undertone as so many gray paints do. Schloss is a great candidate to pair with a wood top because it does not make the wood colors pull orange, which can really be a struggle with gray and blue finishes.
I mixed the paint in a 1:1 ratio of paint powder to water as directed. I did not add any type of bonding agent or mixing agent because I was looking for a lot of texture and chipping in my finish. I applied two coats of paint using a paintbrush. I did a very light hand sand in between coats of paint using 220 grit sandpaper. I allowed the paint to dry overnight and then gave the piece a final sand before sealing. I added some distressing on corners and in areas a piece of furniture would naturally wear from use.
Sealing
For the top of the desks, I used Miss Mustard Seed’s® MilkCoat™ in Matte. I applied three layers using a paintbrush, lightly sanding between coats.
I sealed the body of the desks using Miss Mustard Seed’s® MilkWax™ in Clear. I applied the wax using a wax brush, allowed it to dry, then buffed the surface smoothly. After the clear wax was completely dry, I applied a layer of Miss Mustard Seed’s® MilkWax™ in Antiquing to the bodies of the desks using a wax brush. This is when the real magic happens; the wax catches in all of the imperfections and chipped areas, really highlighting the character, and when you buff away the excess wax, you are left with a beautifully aged finish.
The Details
The desks would have been really cute by themselves, but I felt like adding storage baskets really helped to repurpose the pieces into a function nightstand or side table. The texture from the woven baskets added a little bit of softness to the really square and almost industrial construction of these pieces. Finding baskets shallow enough to fit into the cubbies was challenging, but I found mine at Menards, and they were the perfect fit!

Staging
I kept staging pretty simple with this fun woven vase, vintage books, an antique clock, and flowing pathos.
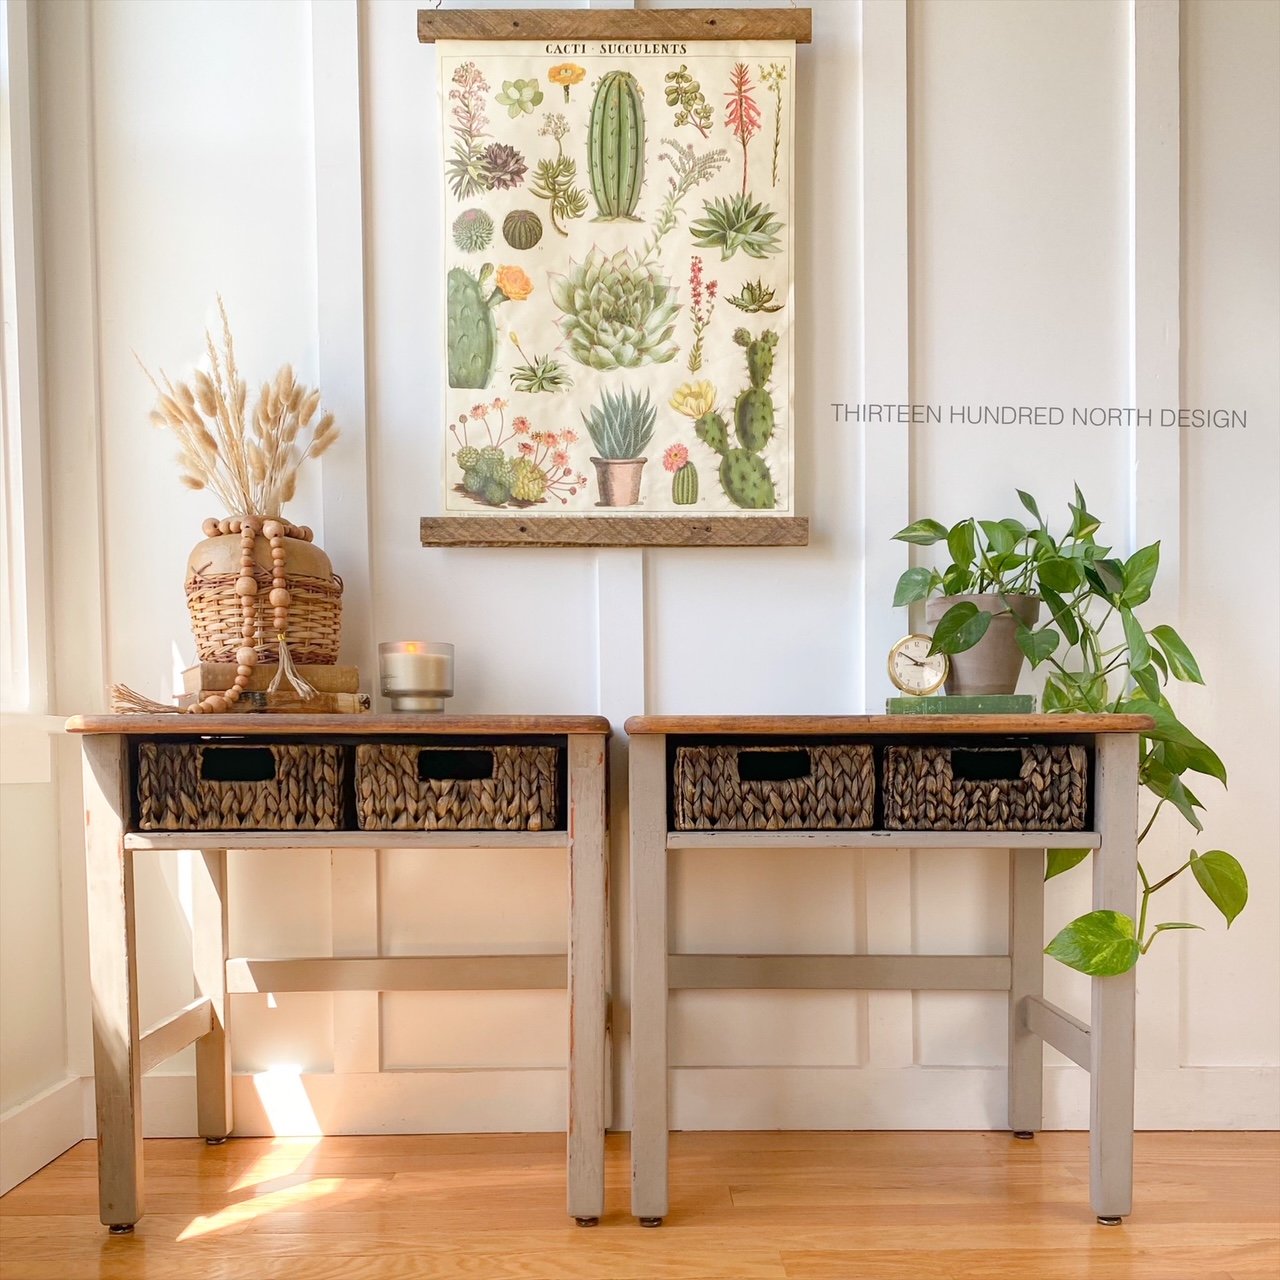
Sets of tables seem to be the furniture I struggle with the most when it comes to staging. I always struggle with balancing the photos and not going too over the top. Side tables are not meant to be sitting directly next to each other in the home, so figuring out how to balance staging decor can be a real challenge. My only real advice for staging side tables would be that less is more. Use a larger object on either side to anchor the photo, add a central focal point to bring the eyes in, and avoid mirroring the decor on both tables.
Conclusion
I used to do a lot more repurposing of furniture when I first started painting. It has been a while since I repurposed a piece into something else, but I need to take a look at my inventory after this project! I love the way these little desks were transformed but maintained their character. I think taking the time to preserve the carvings and scratches on the tops was well worth it; that kind of distressing is hard to recreate.
I believe this was my first time doing a larger project in Miss Mustard Seed’s® Schloss, and it is such a gorgeous shade of gray. The addition of the antiquing wax made it even better, so I will certainly be using that in the future. I can’t wait to see who snatches these cuties up and what they do with them!
Happy Painting!