
DIY Star-Themed Holiday Decor

Now is the time to create your DIY holiday decor. This year, we wanted to focus on creating a Nordic-Inspired Christmas with neutrals using Ironstone, Marzipan, Schloss, and Typewriter.
We have a handful of DIY holiday projects that we will be sharing with you over the next few weeks. For our first project, we will be showing you how we created star ornaments, a star garland, and a pinecone wreath.
Inspiration
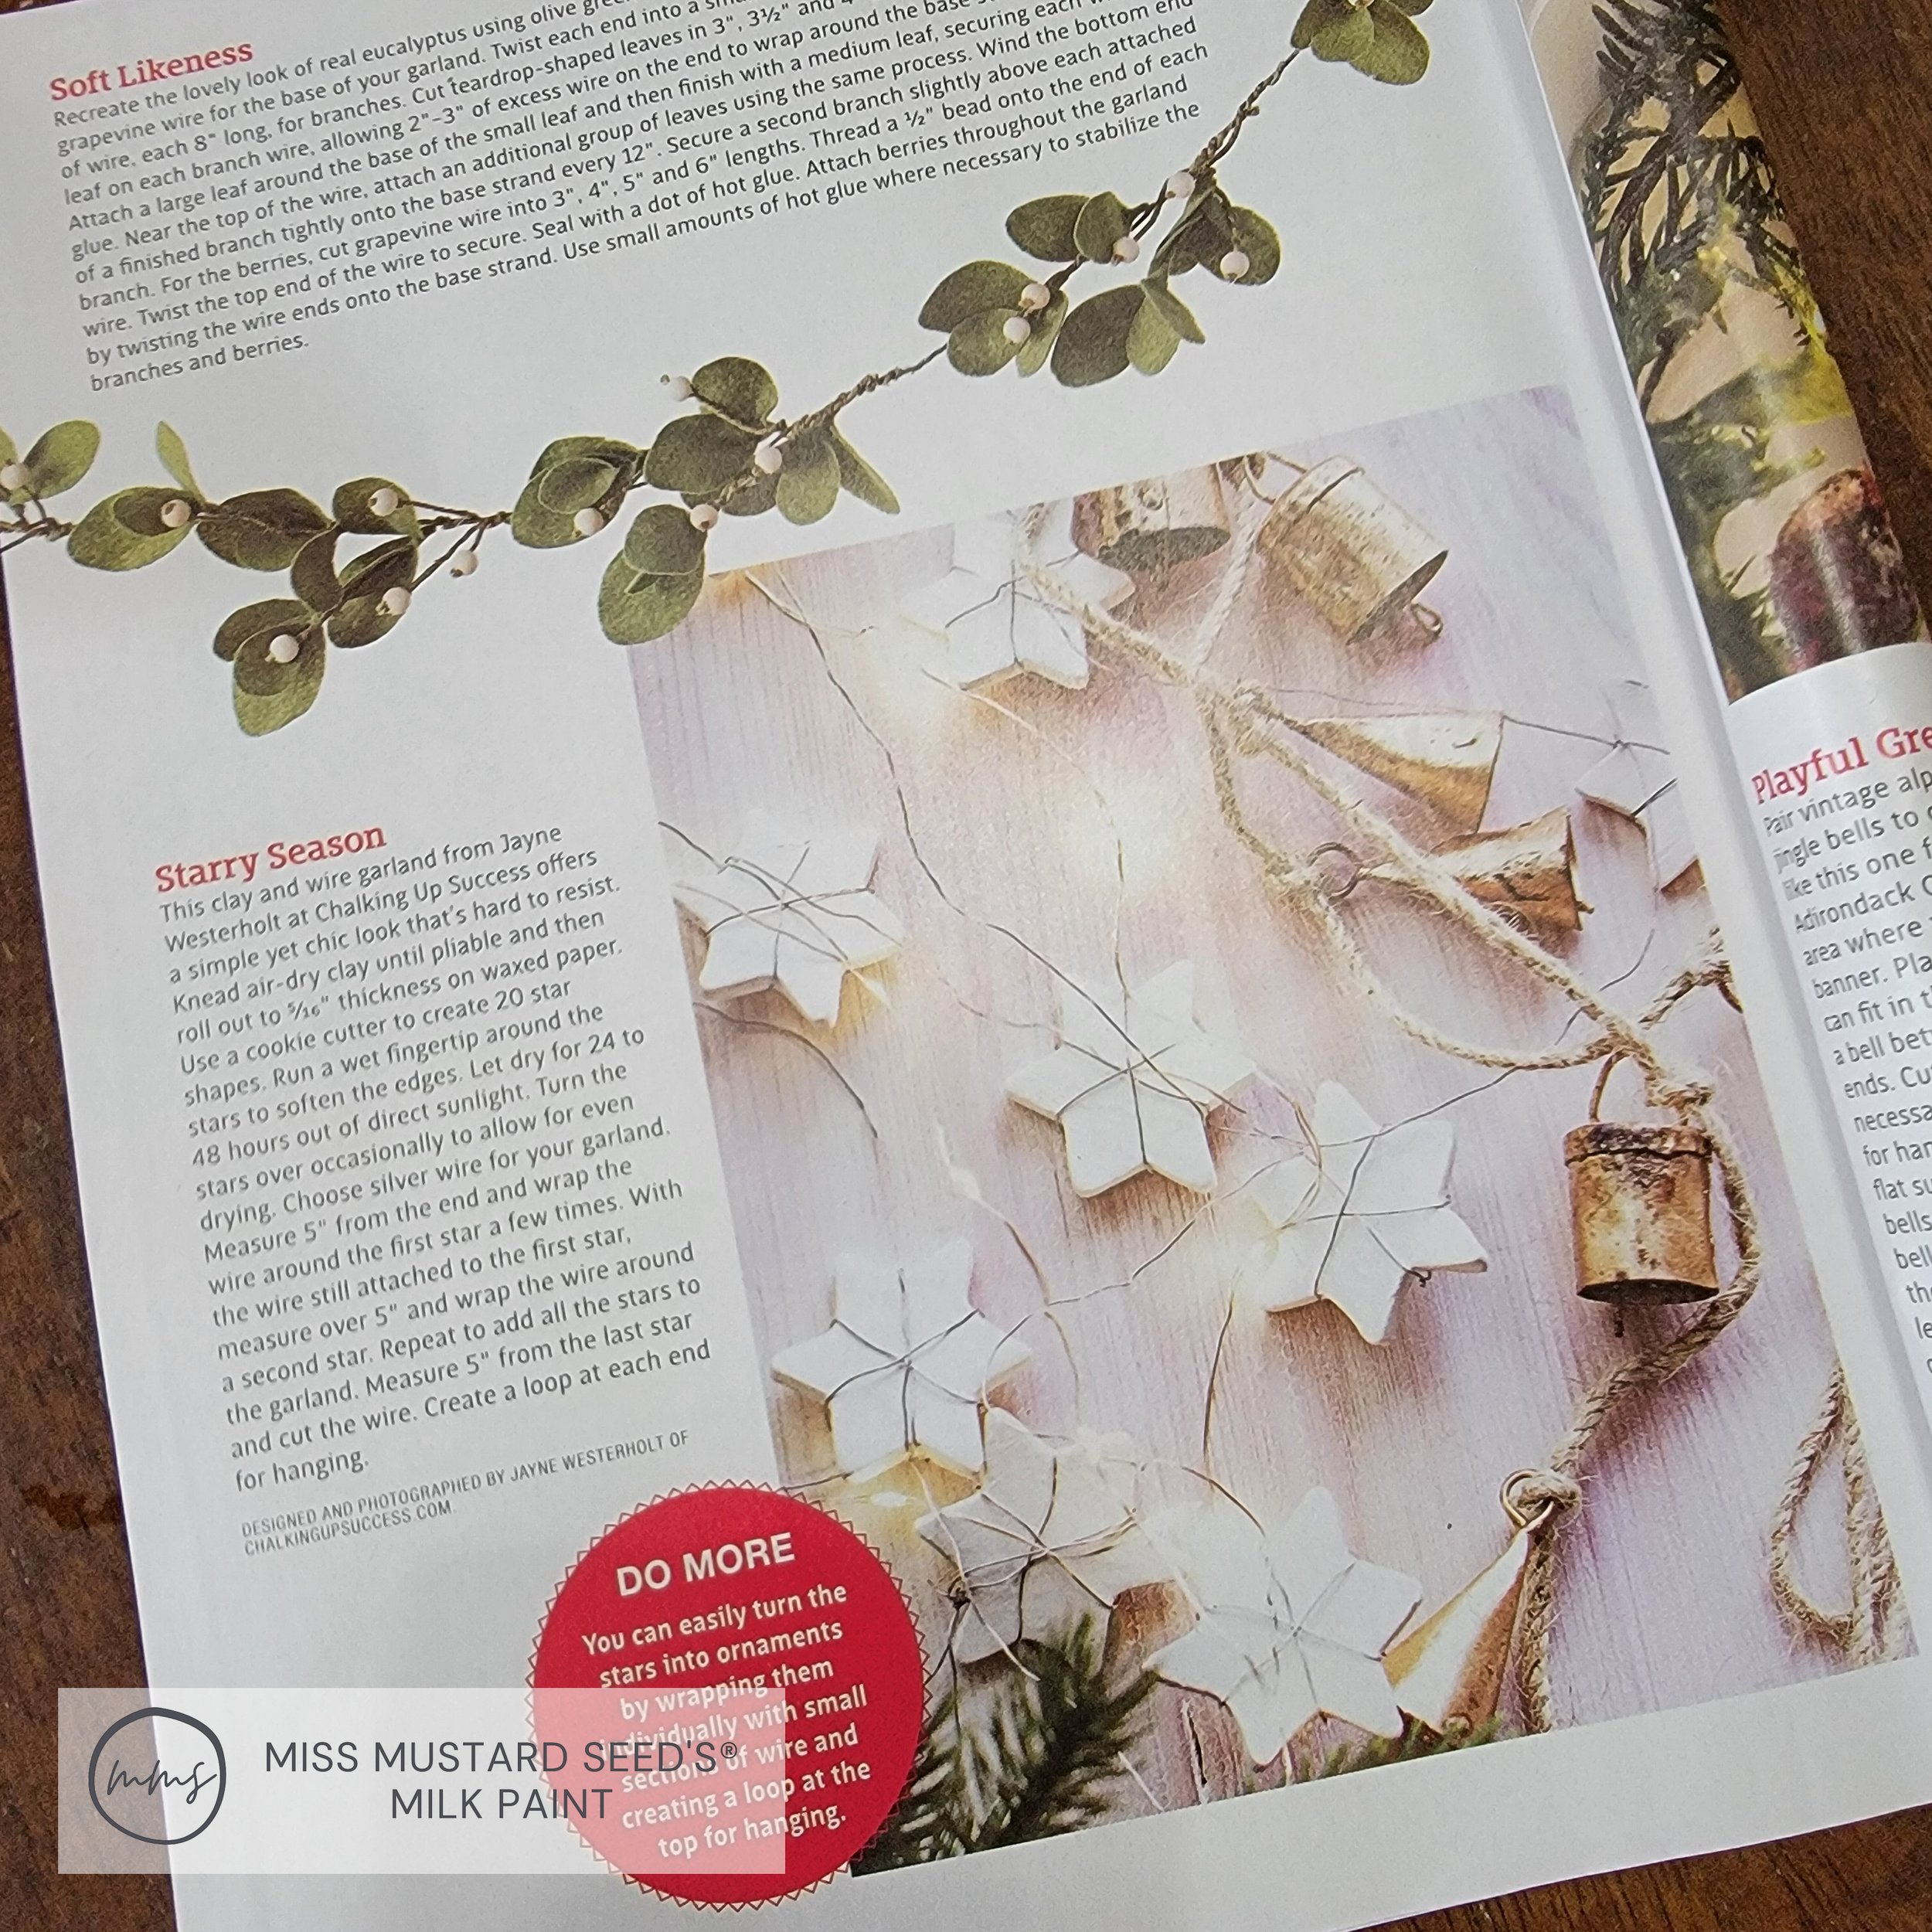
We were flipping through the Winter 2022 Edition of Country Sampler Farmhouse Style and saw this cute DIY project using fairy lights and salt dough stars. These are a perfect addition to our Nordic-inspired Christmas. However, we decided to recreate them using wooden stars, MilkPaint™, Copper Wire, and Fairy Lights (instead of Silver as pictured).
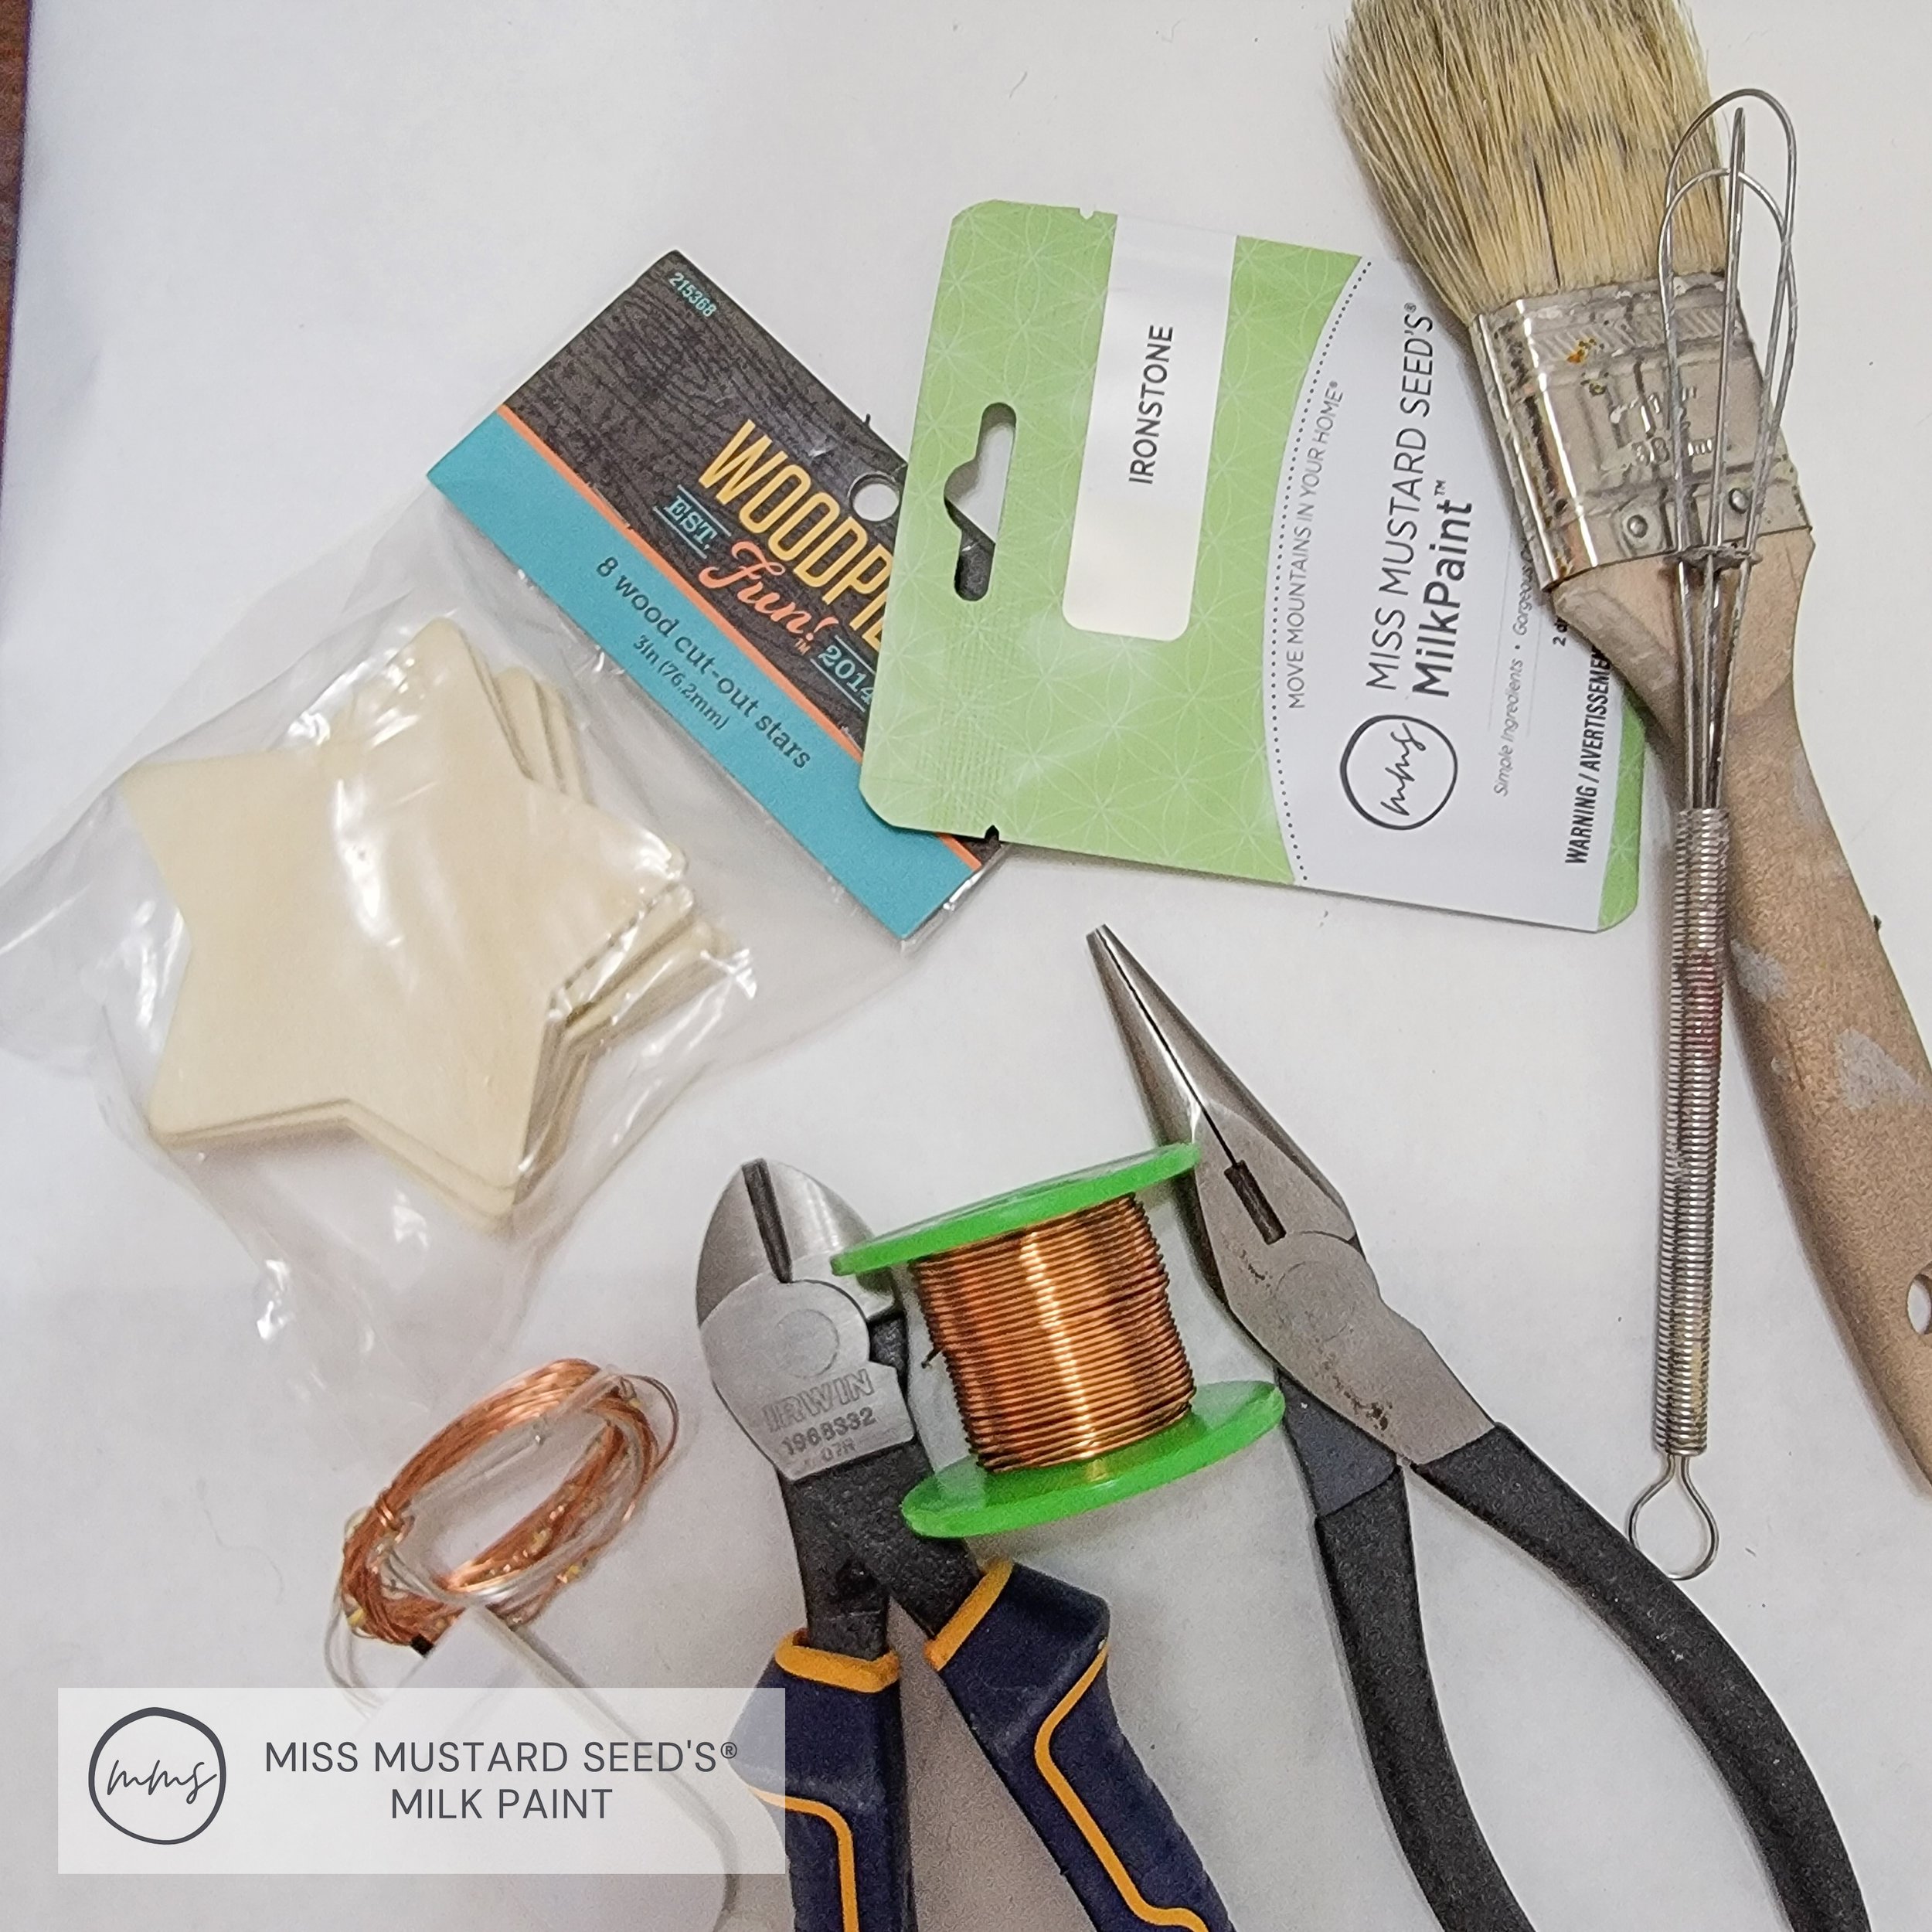
Supplies
Ornaments and Garland
Marzipan (Coming back in early 2023)
MilkMix-EZ™ Anti Foaming Agent (optional)
Paintbrush
Wooden stars (or make your own out of salt dough or air-dry clay)
Ornaments - 5 stars per strand
Garland - 9 stars for 48” garland
Ornaments - 1 strand each
Garland - 2 strands
Wreath

Pinecones various sizes
Hot glue gun & glue sticks
Wire Cutter
Needle Nose Plyers
Scissors
Mix MilkPaint™
We will be using this Nordic-inspired color palette for all of our DIY holiday projects. For the star projects, we will only be using the lighter colors: Ironstone, Marzipan, and Schloss.

Our mixing measurements for this project are as follows:
4 TBSP Ironstone : 4 TBSP Water
2 TBSP Marzipan : 2 TBSP Water
2 TBSP Schloss : 2 TBSP Water
We added a few drops of MilkMix-EZ™ Anti-Foaming Agent when mixing Ironstone because it tends to foam when mixing. Note: MilkMix-EZ™ is not necessary, it serves to reduce mixing time and foaming.
To learn how to mix MilkPaint™, click here or watch the video below.
Paint the Stars
Lay stars out on a paintable surface - we placed a layer of craft paper down to protect the table underneath. We made sure to separate our stars into groups based on the colors they would be painted to prevent painting the wrong stars since they would not all be white. We painted 28 stars in Ironstone for the ornaments (plus 3 for the wreath) and 9 in all three colors, Ironstone, Marzipan, and Schloss, for the garland (each color was painted on three stars). Ironstone will require more coats depending on the star medium.

Painting the Stars
We applied 2-3 coats of paint to each side of the stars. (Don’t forget to paint the edges!)

Schloss, Marzipan and Ironstone Stars
Lighted Star Garland
Once the stars were dry, we moved on to creating our garland. We started the garland by creating a hanging loop using wire (do not cut) and twisting the wire around itself to finish it. Needle nose pliers come in handy when finishing the twist. Then we wrapped each star leaving about 2 inches of wire between each one. Alternate the method of wrapping so each one looks different than the one next to it. Our garland consisted of an alternating pattern: Ironstone, Marzipan, Schloss, repeat.

Copper Wire wrapped Schloss Star

Copper Wire wrapped Marzipan and Ironstone Stars
Once the garland is complete and there was a hanging loop on each end, we loosely wrapped the stars with fairy lights. We used two strands of fairy lights on the garland, starting in the middle of the garland and working back to each end. *Tip: make sure the battery packs are on the ends of the garland to help hide them from view.

Wrapping the Stars with Copper Fairy Lights

Use Fairy Lights to Secure the Copper Wire
After our garland was complete, we hung it from the fireplace mantel and paired it with a rag garland with alternating buffalo check fabric and burlap strips. Both garlands are about 48” long.

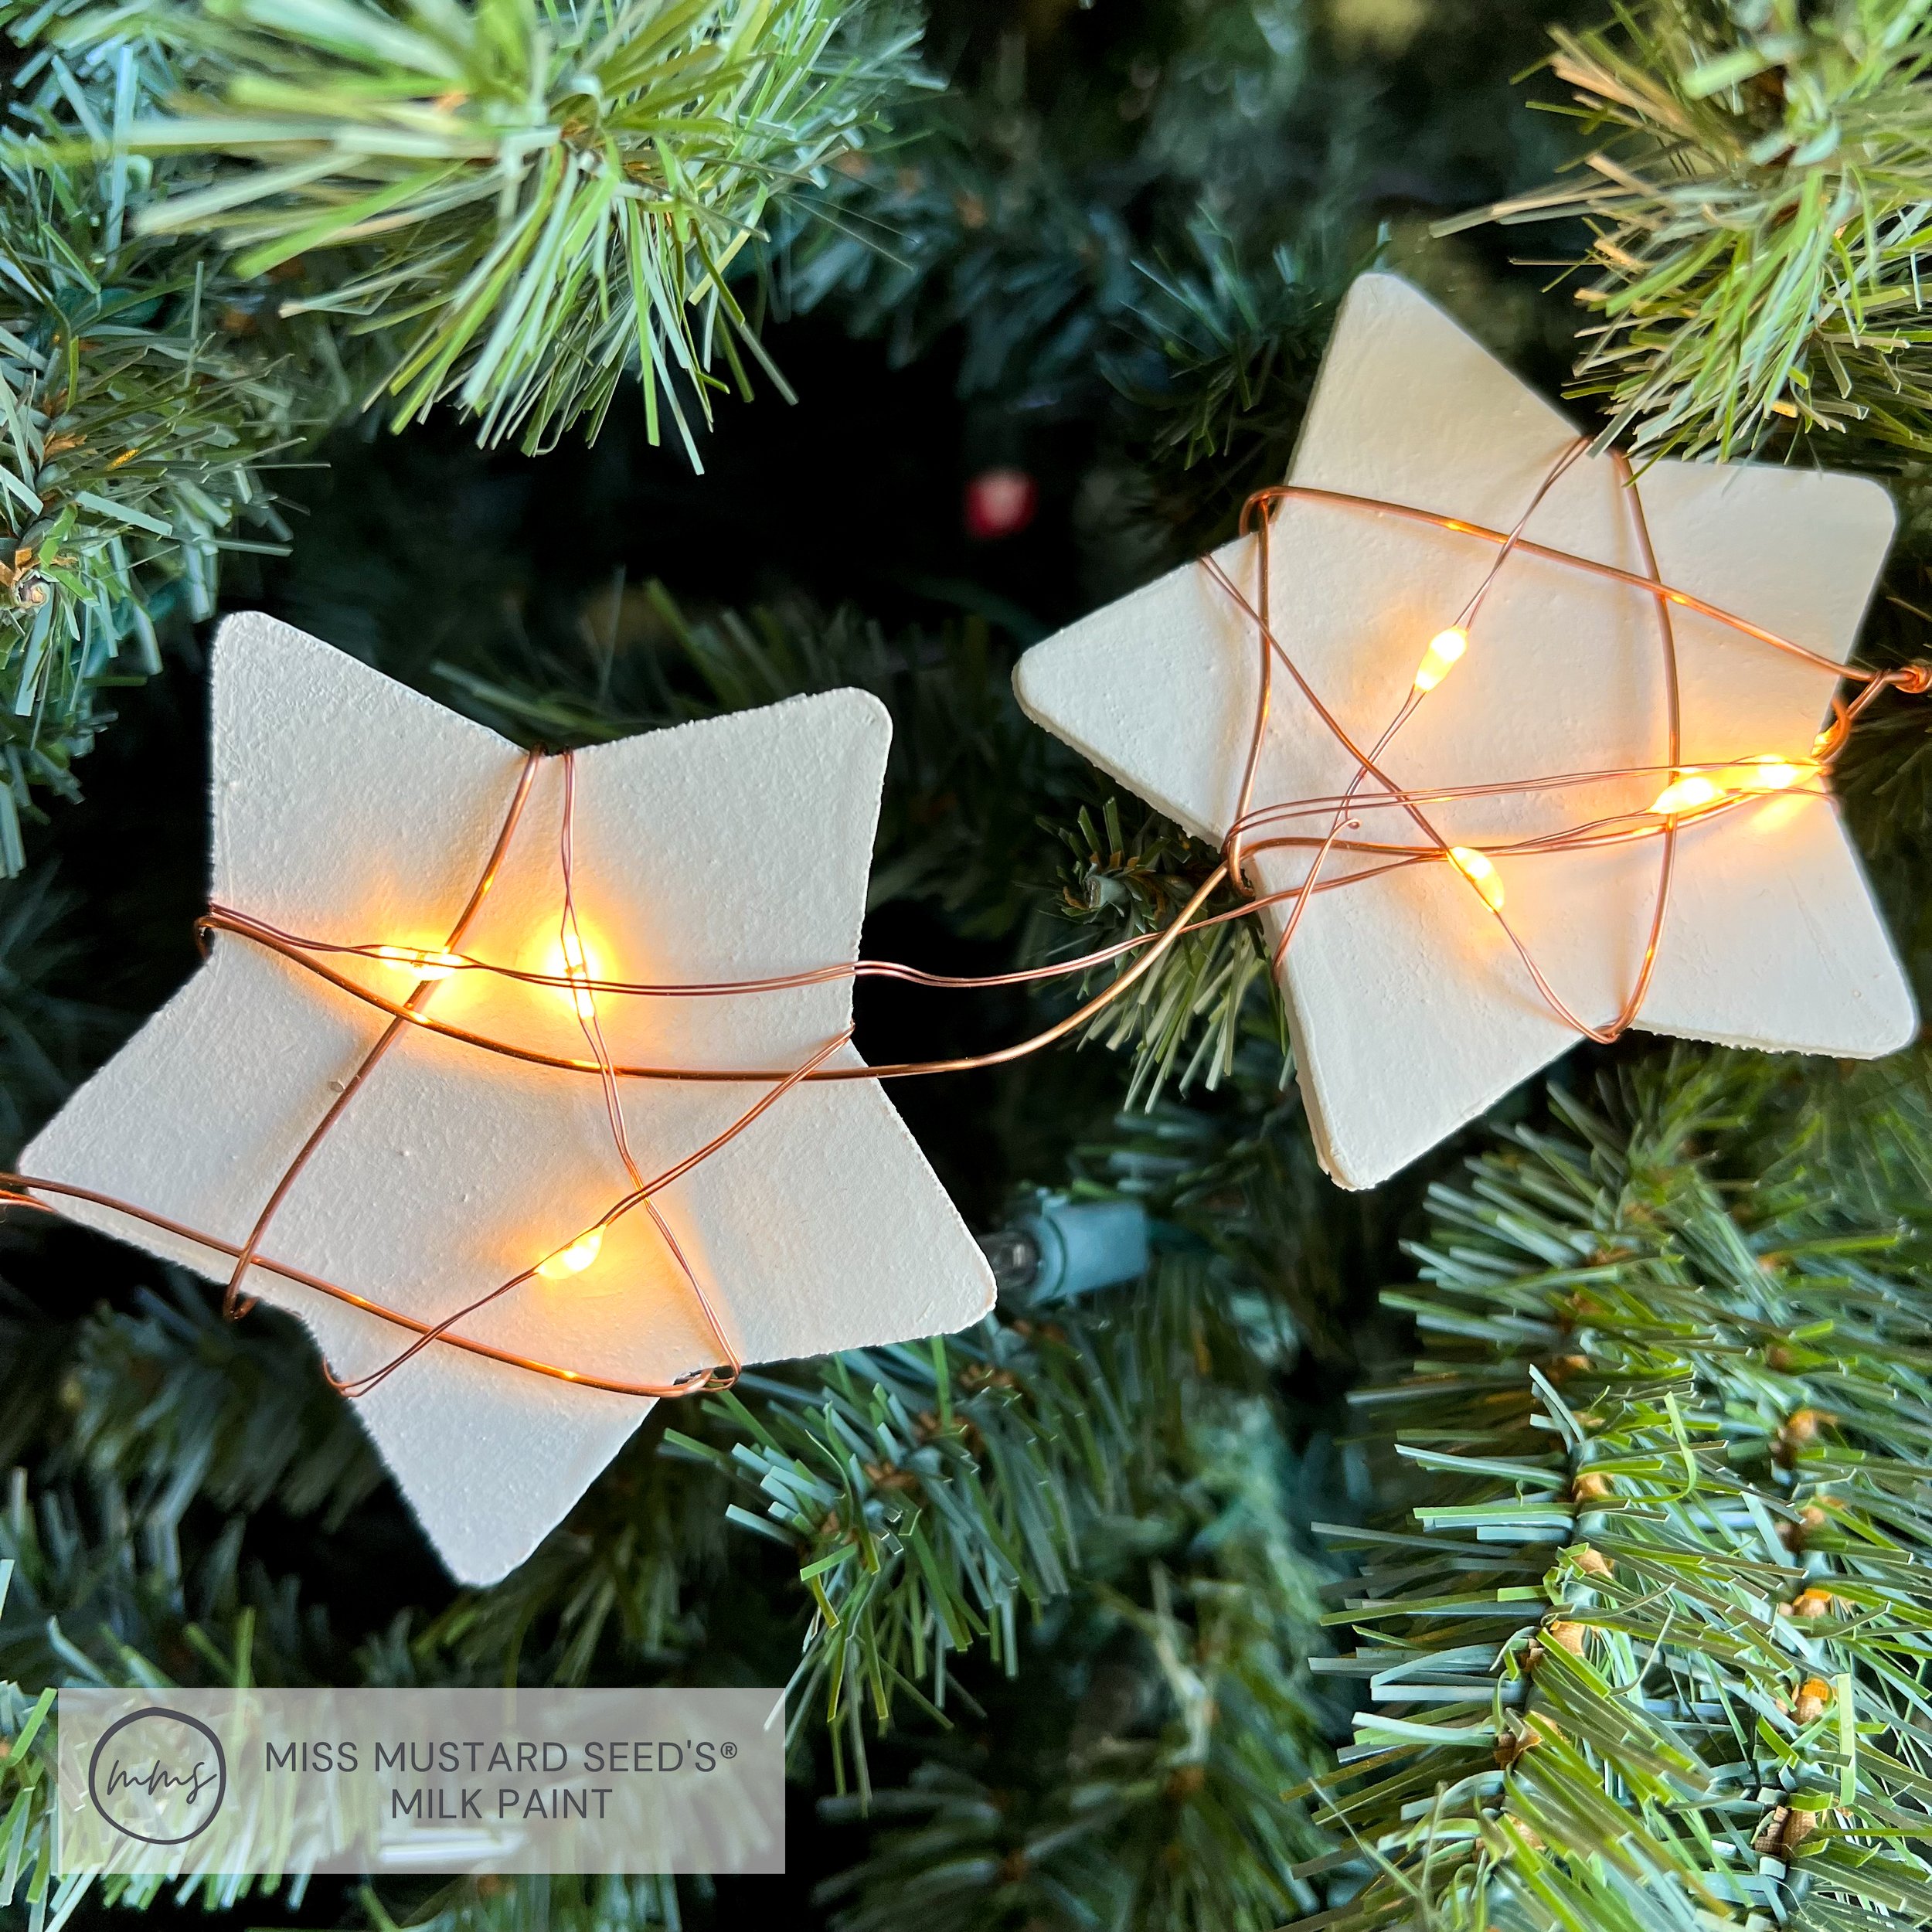
Lighted Ironstone Star

Star Garland layered over Buffalo Check and Burlap Garland
Wire-Wrapped Star Ornaments
We used the same wrapping technique with copper wire and copper-wired fairy lights to wrap our star ornaments. First, we created the hanging loop and then wrapped the five stars in copper wire with about an inch between each star. Then one strand of fairy lights was used to wrap each one lightly. We used a small strip of wire to hold the battery pack in place with enough excess to tuck it into a branch on the tree. One 6 ft strand of fairy lights wrapped all five stars. We used 25 stars, giving us five strands of 5 stars. These ornaments can also be used to decorate greenery on a table centerpiece or to light up a wreath - the possibilities are endless.
Star Ornaments on Tree
We paired these wire-wrapped star ornaments with burlap and buffalo check ball ornaments, pinecones, and small burlap bows.

Star Ornaments on Tree
We left a few open spaces on our tree, where we will be adding large painted gnome ornaments. Stay tuned for a how-to post next week on gnome ornaments and coordinating painted wooden trees!
Pinecone Wreath with Hanging Stars
How about a bonus idea to tie all of these holiday decorations together? We decided to create this pinecone wreath with a bow and hanging stars. The wreath with buffalo check bow coordinates with our pinecones and star ornaments used on our tree.
To make the pinecone wreath, we hot-glued pinecones to a grapevine wreath (18”). We kept our pinecones plain; however, you could paint the edges white to give them a snowy look. We started with the center row around the entire wreath working into the middle, and then repeated the steps around the outside. The pinecones were gathered from our own trees, so they varied in size and shape. We added small ones anywhere there was a gap.

Back Side of Grapevine Wreath

Front Side of Grapevine Wreath
Creating the Bow
To finish the wreath, we added a buffalo check bow and hanging stars. We used a 4” wired ribbon that is double-sided. Which eliminates a few steps when making the bow. Start by folding the bow in a z pattern until you have three loops on each side approximately 12” long. Ensure the ends are left slightly longer than the rest of the bow.

Measuring the Supplies
Pinch the center tight and secure using a strip of twine tied in a knot. Trim the excess.

Pinching the Ribbon

Tying a Knot
Fold the ends of the tails and trim them in a v shape.

Folding the Ribbon

Cutting the Tails

Bow Tail
Cut a 36” strip of ribbon and tie it around the base of the bow, don’t forget to trim the tails in the same v shape. We also added a 12” strip of twine to attach the bow to the wreath.

Adding the Long Tails

Adding the Twine
Decide if you want the bow at the top or bottom and attach to the wreath. We added it to the top so we could hang stars in the middle of the wreath. Use the wire to help shape the bow. It doesn’t need to be perfect or symmetrical. We just pull and fluff until we like the shape. Add a bit of wave to the tails, and you’re finished with the bow.

Shaping the Bow
In the final step, we hung the three wire-wrapped stars in the center of the wreath. We wired each star separately, leaving about 6-8 inches of excess wire. Twist the wire together at the top and hook it to the wreath below the bow.

Copper Wire Wrapped Ironstone Stars
Use the wire to place the stars where you want them. Tip: we had to hang the wreath to get the placement right.

Pinecone Wreath
Want to see a final look of the tree and mantle? Stay tuned to see our Nordic-inspired Christmas after we have shared all of our projects for DIY decorations over the next few weeks.
